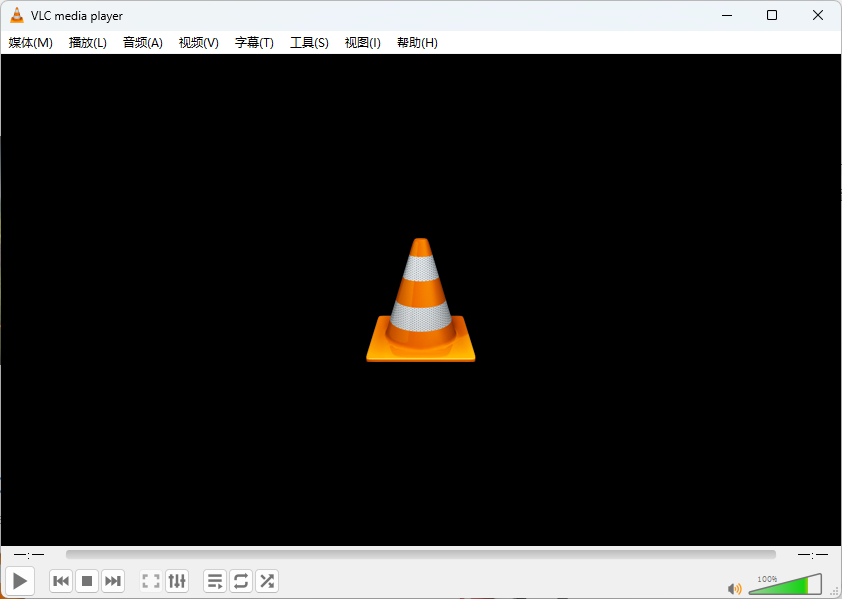
一,VLC
VLC 是一款自由、开源的跨平台多媒体播放器及框架,可播放大多数多媒体文件,以及 DVD、音频 CD、VCD 及各类流媒体协议。
1,主页地址
2,源码地址
https://github.com/videolan/vlc
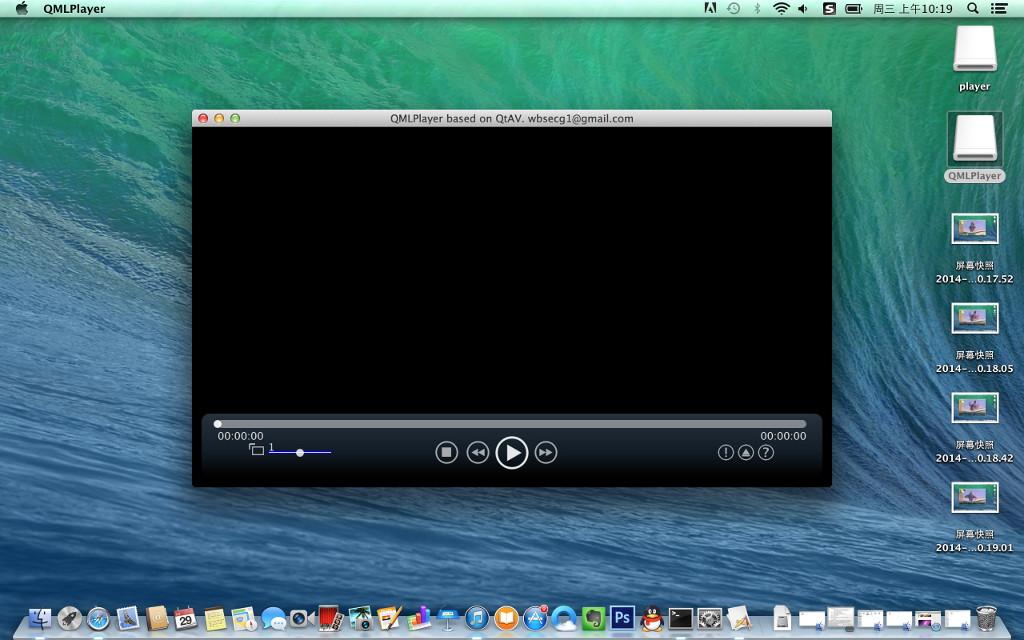
二,QtAV
基于Qt和FFmpeg的跨平台高性能音视频播放框架。
1,主页地址
2,源码地址
https://github.com/wang-bin/QtAV
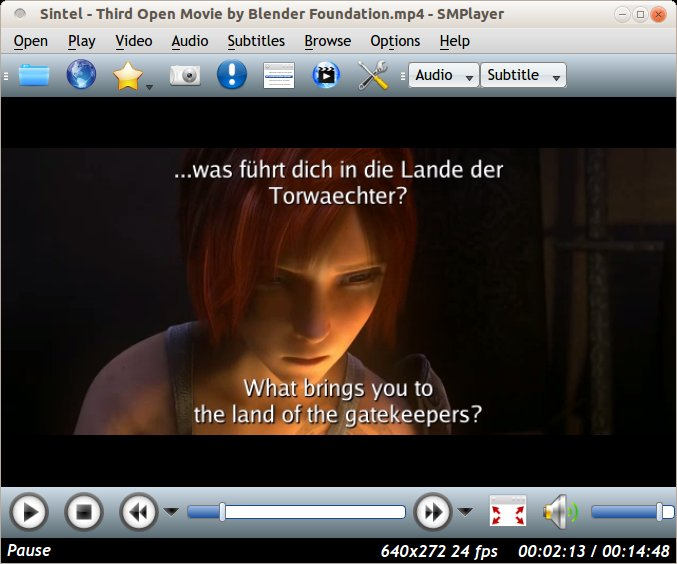
三,smplayer
1,主页地址
2,源码地址
一,VLC
VLC 是一款自由、开源的跨平台多媒体播放器及框架,可播放大多数多媒体文件,以及 DVD、音频 CD、VCD 及各类流媒体协议。
1,主页地址
2,源码地址
https://github.com/videolan/vlc
二,QtAV
基于Qt和FFmpeg的跨平台高性能音视频播放框架。
1,主页地址
2,源码地址
https://github.com/wang-bin/QtAV
三,smplayer
1,主页地址
2,源码地址
1,Qt在线安装工具
目前都是采用在线安装的方式,前提是需要注册。
https://download.qt.io/official_releases/online_installers
2,QtCreator
IDE单独下载地址。
https://download.qt.io/archive/qtcreator
3,vs插件
windows下使用vs开发,可以安装这个插件。
https://download.qt.io/archive/vsaddin
4,arm环境下安装Qt开发环境
arm下比如ubuntu环境,可直接用apt 指令安装,但是目前仓库中的最新版本时5.9。
如下是把能装的都装了,如果空间有限,请自行裁剪。
sudo apt-get install qtbase5-dev qtbase5-dev-tools qtchooser qt5-qmake qtcreator
sudo apt-get install qtbase5-examples qtbase5-doc-html qtdeclarative5-dev qml-module-qtquick-controls2 qml-module-qtquick-extras qml-module-qt-labs-platform
sudo apt-get install qtmultimedia5-dev  libqt5multimedia5-plugins qml-module-qtquick-virtualkeyboard  libqt5svg5* qtbase5-private-dev qml-module-qt-labs-folderlistmodel
sudo apt-get install qml-module-qt-labs-folderlistmodel qml-module-qtquick* qtquickcontrols5-* qml-module-qtquick2
5,vs最新版
https://visualstudio.microsoft.com/zh-hans/downloads/
状态描述了当前用户界面样子,QML中一个状态定义了一组属性的改变,并且会在一定条件下被触发。
假设有这么一个场景,红黄绿三个灯,用一个按钮,点击后依次切换三个灯亮起。使用QWidget的思路去实现就是在按钮click对应的槽函数中,依次获取三个button的指针,然后改变其颜色,这样也能实现,但是不够优雅。QML的思路是,全局定义一组状态,然后每个状态来控制具体的属性,使用时只要切换不同状态就可以了,后续修改的话,只需要修改这个全局状态就行,并且三个按钮集中暴露在这组状态中。
一,定义三个灯
//三个灯的按钮
    Row{
        anchors.centerIn: parent
        spacing: 20
        //红灯
        Rectangle{
            id:red
            width: 50
            height: 50
            radius: 50
            color: "red"
        }

        //黄灯
        Rectangle{
            id:yellow
            width: 50
            height: 50
            radius: 50
            color: "yellow"
        }

        //绿灯
        Rectangle{
            id:green
            width: 50
            height: 50
            radius: 50
            color: "green"
        }
    }
二,定义一组状态,每个状态控制 三个灯具体的属性
//定义一组状态 规定每个状态下 的属性
    Item{
        id:root
        state:"red"
        states: [
            State {
                //红灯状态 红灯亮 其它灭
                name: "red"
                PropertyChanges {target: red;color:"red"}
                PropertyChanges {target: yellow;color:"gray"}
                PropertyChanges {target: green;color:"gray"}
            },
            State {
                name: "yellow"
                PropertyChanges {target: yellow;color:"yellow"}
                PropertyChanges {target: red;color:"gray"}
                PropertyChanges {target: green;color:"gray"}
            },
            State {
                name: "green"
                PropertyChanges {target: green;color:"green"}
                PropertyChanges {target: red;color:"gray"}
                PropertyChanges {target: yellow;color:"gray"}
            }
        ]
    }
三,切换时 只需要指定 当前状态是 谁即可。
//依次切换三个状态
    Button{
        anchors.bottom: parent.bottom
        anchors.horizontalCenter: parent.horizontalCenter
        text: qsTr("切换")
        onClicked: {
            if(root.state=="red")
                root.state="yellow"
            else if(root.state=="yellow")
                root.state="green"
            else
                root.state="red"
        }
    }
四,效果

五,过渡
我们还可以在状态切换的时候,加上过渡的动画,让其看起来更丝滑。过渡规定了从状态A到状态B切换时,某个动画的变化。比如下边状态红灯 到黄灯时,红灯和黄灯颜色持续500毫秒。

六,代码
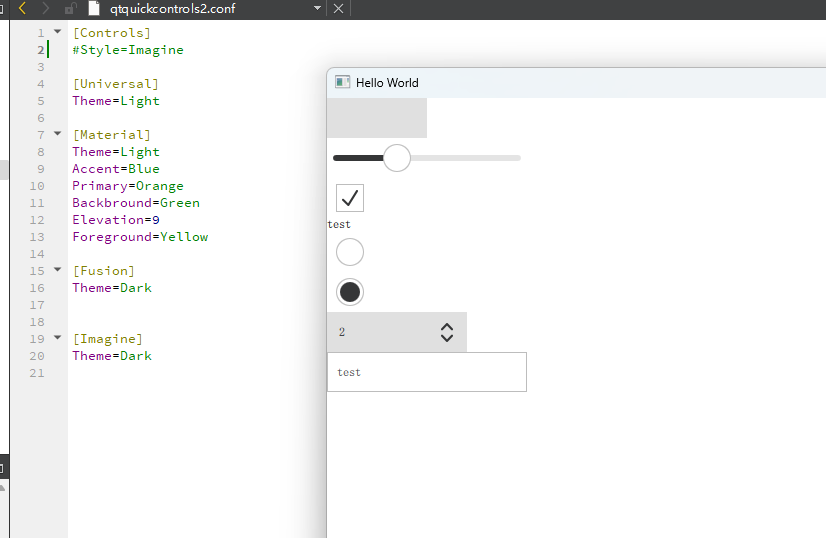
Quick程序提供了方便的用于切换不同风格和主题的配置文件,如果没有设计稿,又想界面没那么丑,那么可以用这套配置,让应用看起来相对专业一点。
一,在 qrc 资源文件中添加 qtquickcontrols2.conf 文件。
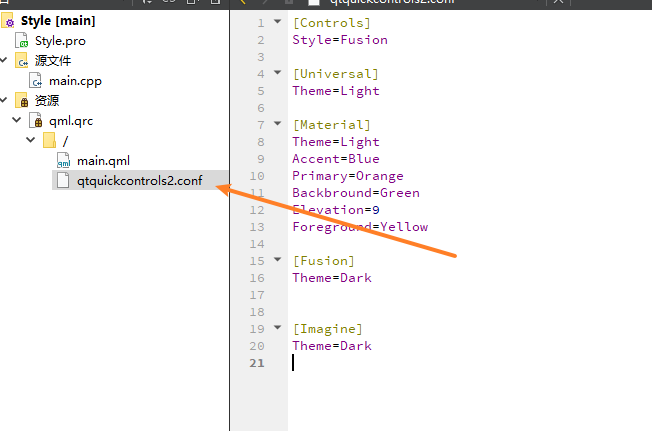
二,编辑这个文件。
qt 共提供5种不同的风格。
1,Default Style:
默认风格,其外观和行为会随着操作系统和系统主题的变化而变化。它保持了跨平台的一致性,并且对大多数常见控件提供了自然的外观。

2,Material Style:
受 Google Material Design 影响的风格,主要用于移动应用程序。它强调了阴影、动画和响应式布局,具有现代感和生动感。

3,Universal Style:
致力于提供一种在不同操作系统上具有一致外观的风格。它适合那些希望应用程序在不同平台上保持相似外观的开发者。

4,Imagine Style:
一种受到 macOS 的设计风格启发的风格,它提供了类似 macOS 风格的外观和交互体验。

5,Fusion Style:
基于 Qt Widgets 的 Fusion 主题,提供了一种类似传统桌面应用程序的外观和行为。
每种风格还可以设置不同的属性。
1. accent,color类型,表示重点色,默认是Pink

2. primary,color类型,表示优选色,默认是Indigo

3. backbround,color类型,表示背景色,默认由主题指定(light或者dark)

4. elevation,int类型,表示海拔高度,值越大,阴影越深,该值与具体控件相关

5. foreground,color类型,表示前景色,默认值由主题指定(light或者dark)

6. theme,枚举类型,表示主题,默认是Light,也可修改为Dark
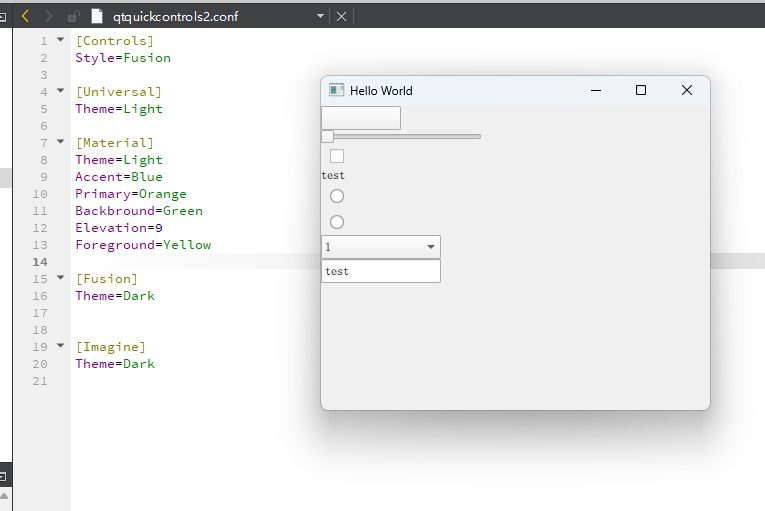
三,看下效果
1,fusion
2,Universal

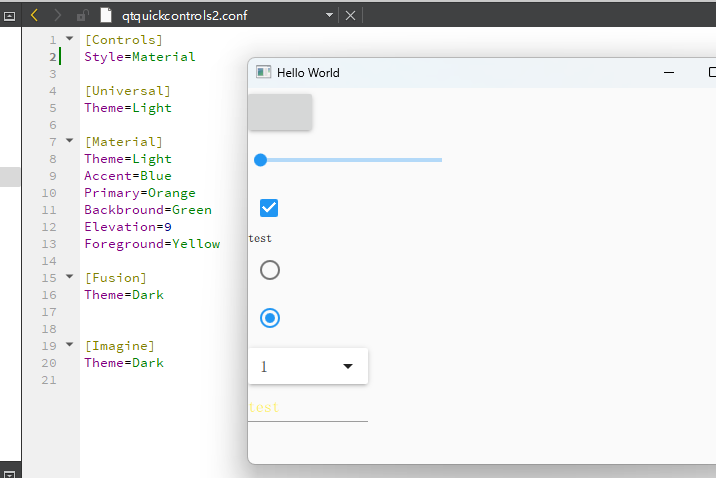
3,Material
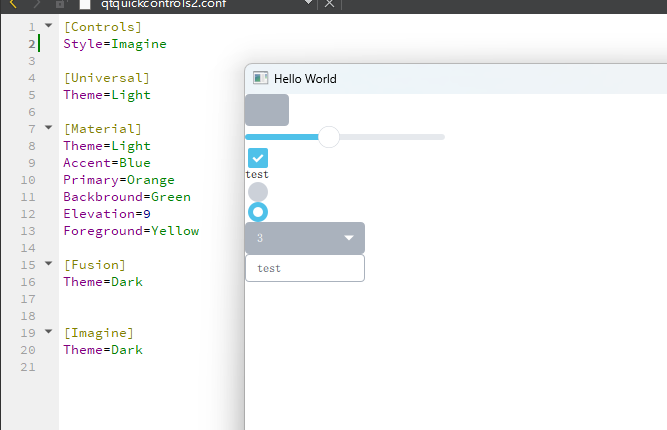
4,Imagine
5,默认风格
6,Dark主题

四,代码
需求:
一个项目,界面是C# 开发的,但是业务上有三维可视化的需求,VTK基于C#的绑定版本需要收费,并且资料很少。因此将VTK嵌入到Qt里,并封装成一个dll,通过接口提供给C#访问。
实现:
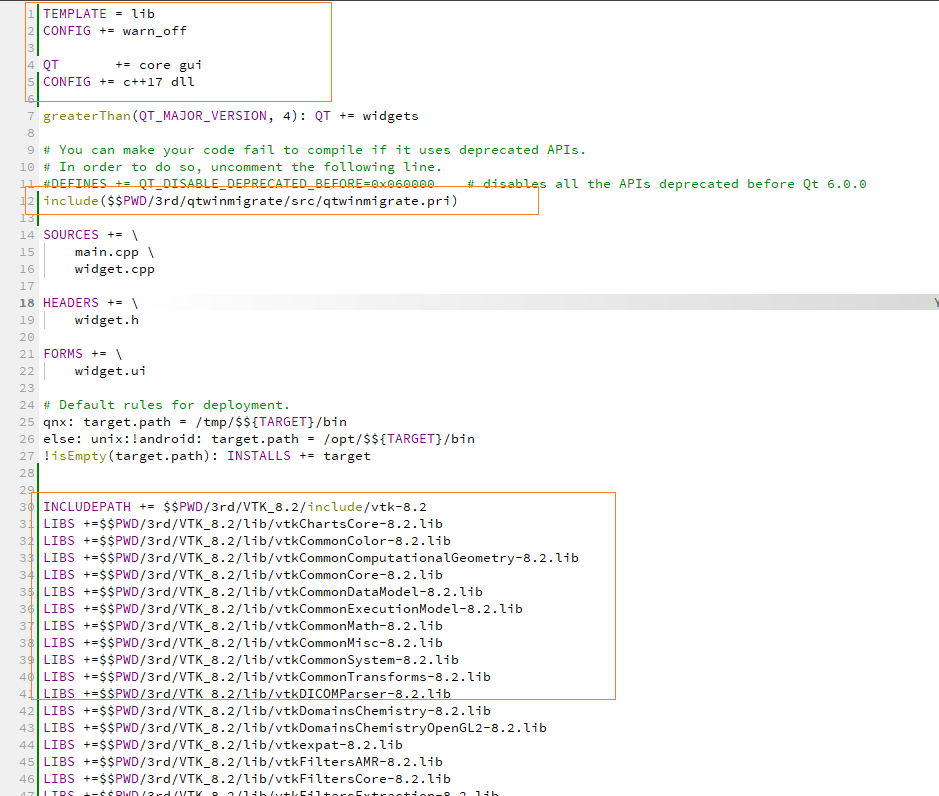
一,Qt程序的配置
这里用到了一第三方库(https://github.com/qtproject/qt-solutions/tree/master/qtwinmigrate),它可以将Qt的窗口给C#使用。
1,首先看pro文件,主要是dll编译配置,和第三方库引用及VTK的依赖库。
2,main.cpp
#include "widget.h"
#include <QApplication>

#include <windows.h>
#include <qmfcapp.h>
#include <qwinwidget.h>

// int main(int argc, char *argv[])
// {
//     QApplication a(argc, argv);
//     Widget w;
//     w.show();
//     return a.exec();
// }

BOOL WINAPI DllMain( HINSTANCE hInstance, DWORD dwReason, LPVOID /*lpvReserved*/ )
{
    static bool ownApplication = FALSE;

    if ( dwReason == DLL_PROCESS_ATTACH )
        ownApplication = QMfcApp::pluginInstance( hInstance );
    if ( dwReason == DLL_PROCESS_DETACH && ownApplication )
        delete qApp;

    return TRUE;
}

QWinWidget *win=nullptr;
extern "C" __declspec(dllexport) bool initWindow( HWND parent )
{
    if(parent==nullptr)
        return false;
    win = new QWinWidget(parent);
    Widget *widget = new Widget(win);
    widget->show();
    win->move(0,0);
    win->show();

    return TRUE;
}

extern "C" __declspec(dllexport) bool destroyWindow()
{
    if(win!=0){
        win->close();
        delete win;
    }

    return TRUE;
}
3,Widget 写法,可以参考这篇文章(http://qthello.com/index.php/2024/04/11/vtk/)或者看仓库上的源码。
二,C#端
1,引用dll 并调用接口
using System.Runtime.InteropServices;
using System.Text;
using System.Threading.Tasks;
using System.Windows.Forms;

namespace WindowsFormsApp
{
    public partial class Form1 : Form
    {
        [DllImport("VTKNet.dll", EntryPoint = "initWindow", CharSet = CharSet.Ansi)]
        public extern static bool initWindow(IntPtr parent);

        [DllImport("VTKNet.dll", EntryPoint = "destroyWindow", CharSet = CharSet.Ansi)]
        public extern static bool destroyWindow();

        public Form1()
        {
            InitializeComponent();
            //打开窗口
            initWindow(this.Handle);
        }
    }
}
2,exe路径下 需要把自己的dll ,Qt的dll 以及VTK的dll 全部放进去。

效果:
代码:
经过程序员抓耳挠腮的开发,应用终于开发完毕了,那接下来无论发布给客户还是给测试,最好的方式时打一个安装包,直接给release文件夹,就显得不太专业了。
程序的打包分为两步:
1,将所以依赖文件收集全,确保其它非开发机器运行时,不会缺少库。
2,用第三方打包软件,制作安装包。

一,收集依赖文件
1,我们以一个QML程序为例,新建一个pkg/v1.0.0/bin文件夹,并将 release版本的pkgTest.exe拷贝到这个bin文件夹下。
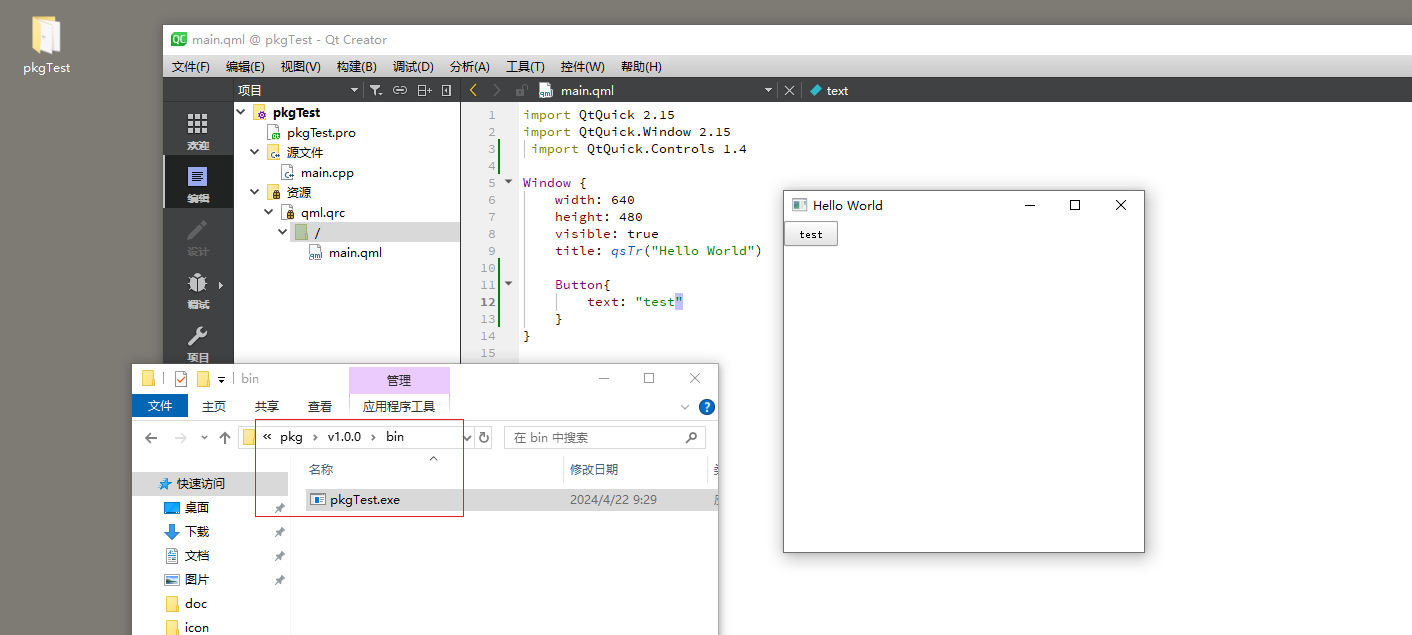
2,找到对应版本的Qt命令行工具。
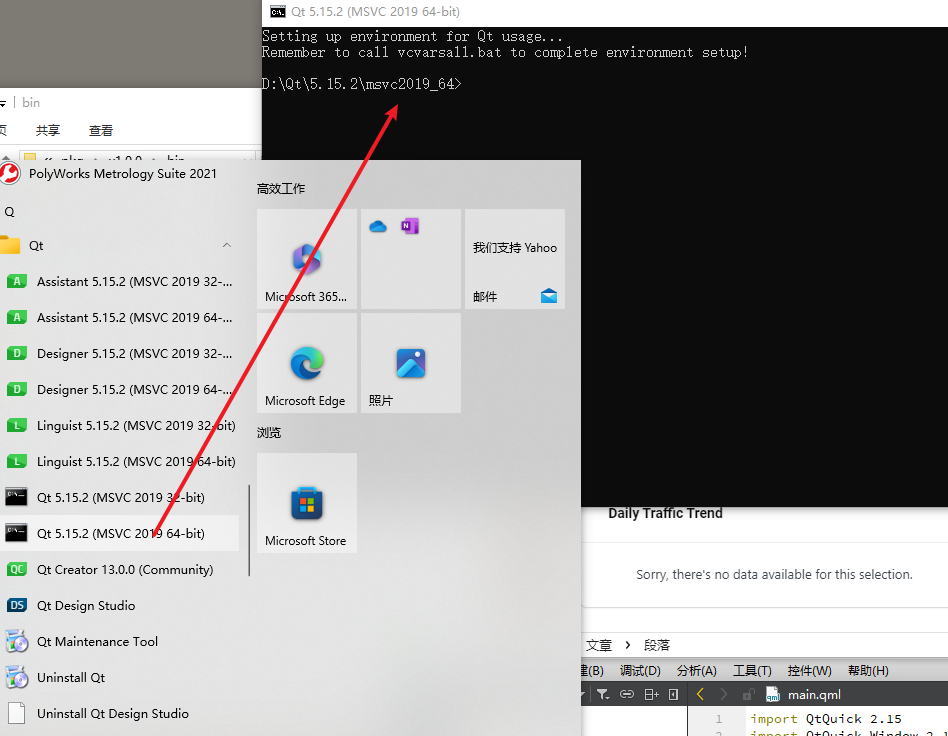
3,执行windeployqt.exe 执行,自动收集依赖文件。

4,这个指令只能收集一部分程序,执行后自己双击一下主程序(pkgTest.exe),看还缺啥,手动拷贝一下。最可靠的办法是找一台非开发机器验证。
二,打包工具打包
我习惯使用NSIS+HM NIS EDIT 这两个工具进行打包,原因就是颗粒度更细,可以控制环境变量、自启动等。并且官网提供了大量的插件,设置上更加的自由。
1,安装打包工具 NSIS ,这个是一个基础的库( https://nsis.sourceforge.io/Download)
2,安装编辑器,这是配套使用的一个编辑器。只用上边那个也可以,只是加上这个更方便(https://hmne.sourceforge.net/)
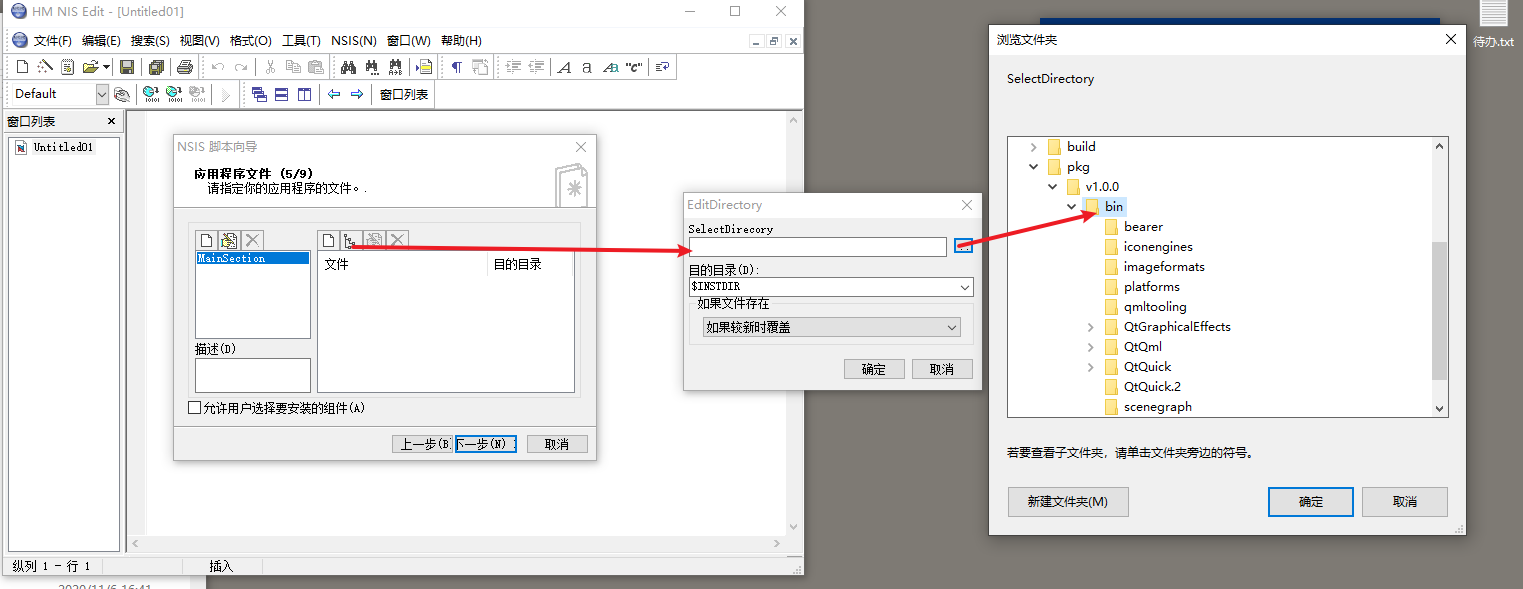
3,使用。我们第一步可以建立一个向导,按照向导,一步一步操作。

安装语言可以自己选择,一个或者多个都可以。

选择目录这一步很关键,把自带的两个删掉,然后指定我们的主程序的父目录,也就是bin文件夹。
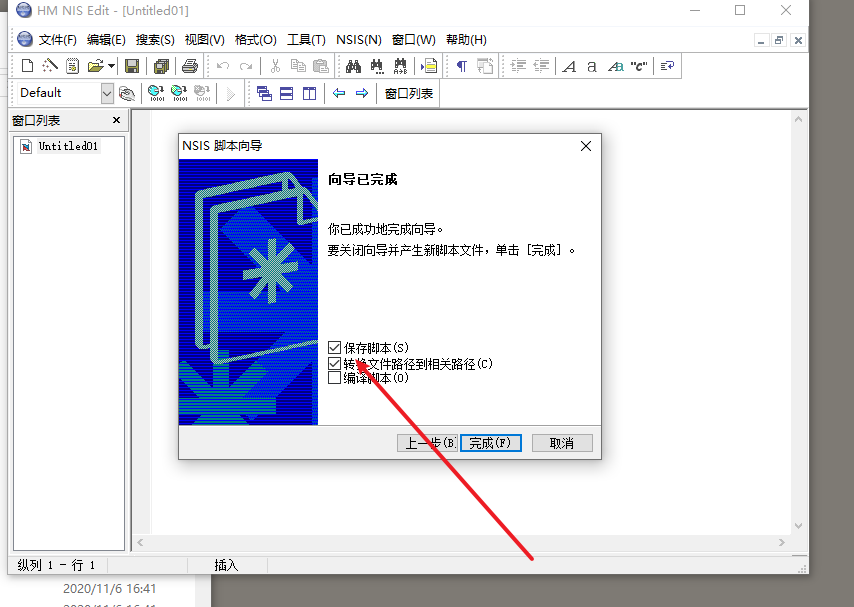
之后下一步,下一步,选择将脚本保存,便于后期修改。
最后就是编译脚本,生成安装包。
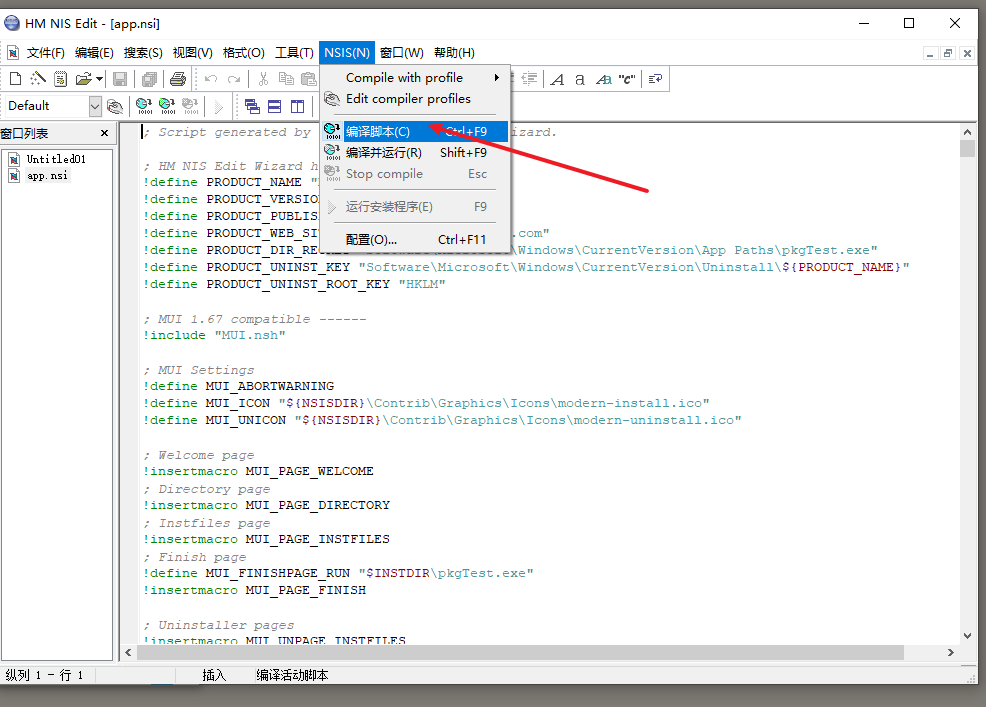
安装包生成到了脚本所在目录,双击可以自己验证下。

三,NSIS 指令
NSIS 官网提供了大量的插件(https://nsis.sourceforge.io/Category:Plugins),自己可以根据业务需要去下载,并且它本身也有大量的指令,可以支持更高的定制化需求。
1,静默安装。 比如安装其他依赖的exe,不想弹出来提示框,让其他在后台默默执行。
SilentInstall silent
SilentUninstall silent
比如 下边的代码,将Video.exe 在后台执行
SilentInstall silent
SilentUninstall silent
Section "MainSection" SEC01
  SetOutPath "$INSTDIR"
  SetOverwrite try
  File "path_1.0.1\Video.exe"
SectionEnd
2,安装后运行指定程序
Function .onInstSuccess
ExecShell "" "$INSTDIR\Video.exe"
FunctionEnd
3,安装后 开机自启。其实就是写注册表
WriteRegStr HKCU "Software\Microsoft\Windows\CurrentVersion\Run""Video" "$INSTDIR\Video.exe" ; 开机自启

DeleteRegValue HKCU "Software\Microsoft\Windows\CurrentVersion\Run" "Video" ;卸载开机启动
4,杀死某个进程。 可以用在安装时,确保当前程序已经被关掉。
需要下载插件:https://www.cnblogs.com/chechen/p/11125353.html
Function .onInit
KillProcDLL::KillProc "Video.exe" ;杀进程
Sleep 1000
FunctionEnd

某些进程杀不掉 用这个:

Function .onInit
ExecCmd::exec '"taskkill" /F /IM hiclass.exe /T'
FunctionEnd
5,管理员运行
WriteRegStr HKCU "Software\Microsoft\Windows NT\CurrentVersion\AppCompatFlags\Layers" "$INSTDIR\Video.exe" "RUNASADMIN" ;管理员运行
6,安装vc环境
; 安装VC环境
Function .onInstSuccess
   Push $R0
   ClearErrors
   ReadRegStr $R0 HKLM "SOFTWARE\Classes\Installer\Dependencies\{e2803110-78b3-4664-a479-3611a381656a}" "Version"

   ; 检测含有vc的注册表信息是否存在
   IfErrors 0 VSRedistInstalled
           Exec "$INSTDIR\vcredist_msvc2015_x86.exe /q"   ;若不存在,执行静默安装
   StrCpy $R0 "-1"
   ;MessageBox MB_OK  $R0

VSRedistInstalled:
   ;MessageBox MB_OK  "已安装"
   pop  $R0
 ; Delete "$INSTDIR\vcredist_msvc2015_x86."
FunctionEnd
7,检测是否是xp系统
需要安装插件: https://blog.csdn.net/xt2zsun/article/details/79379098
#检测 Windows 7
var isWindowsXP
Section
Version::IsWindowsXP
 #获取值
 Pop $isWindowsXP
 ${if} $isWindowsXP == "1"
 MessageBox MB_OK "暂不支持XP系统,请升级到Win7及以上!"
 Quit
 ${EndIf}
SectionEnd
8,右键属性 添加信息
VIProductVersion "${PRODUCT_VERSION}" ;版本号,格式为 X.X.X.X (若使用则本条必须)
VIAddVersionKey  /LANG=2052 "ProductName" "我的程序" ;产品名称
VIAddVersionKey  /LANG=2052 "Comments" "这是我写的一个测试程序" ;备注
VIAddVersionKey  /LANG=2052 "CompanyName" "我的公司名称" ;公司名称
VIAddVersionKey  /LANG=2052 "LegalTrademarks" "Test Application is a trademark of Fake company" ;合法商标
VIAddVersionKey  /LANG=2052 "LegalCopyright" "Copyright (c) 2019 我的公司版权" ;合法版权
VIAddVersionKey  /LANG=2052 "FileDescription" "我的文件描述" ;文件描述(标准信息)
VIAddVersionKey  /LANG=2052 "FileVersion" "${PRODUCT_VERSION}" ;文件版本
VIAddVersionKey  /LANG=2052 "ProductVersion" "${PRODUCT_VERSION}" ;产品版本
9,判断文件是否存在,用于检验插件是否安装
;存在执行 第三行,不存在执行第二行  不存在+1 行
IfFileExists "C:\Program Files (x86)\WinPcap\rpcapd.exe" +3 +2
MessageBox MB_OK  "已安装" ;占位 无实际作用
ExecWait '"$INSTDIR\WinPcap_4_1_3.exe" '
10,删除及创建快捷方式
Delete "$DESKTOP\快乐魔法狮.lnk"
SetOutPath "$INSTDIR"
CreateShortCut "$DESKTOP\快乐魔法狮.lnk" "$INSTDIR\hidteacher.exe"
11,创建环境变量。
EnVar::DeleteValue "vi_algorthmCall_tool_root"
EnVar::AddValue "vi_algorthmCall_tool_root" "$INSTDIR"
一,需求
利用OSG结合FCL实现实现精准的碰撞检测。
二,效果
三,分析
我们看如下这张图,碰撞的逻辑就是,在一个三维场景中,构造一个实体,比如下边的BoxA,然后在物理引擎比如bullet中,或者专用的碰撞检测库中也构造一个对应的实体,比如BoxB。之后在BoxA位姿改变时后,将BoB的位姿也做相应的更新。之后发生碰撞时,物理引擎或者FCL就会给出信号。而这个场景,可以是VTK或者OSG。而碰撞检测可以用Bullet也可以用FCL。
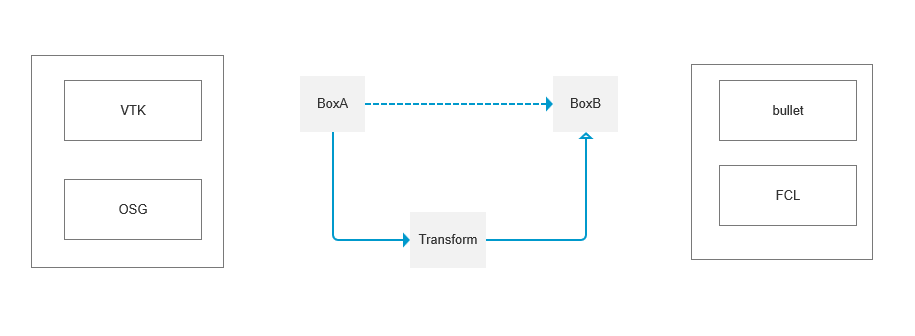
之前用bullet做个尝试,基本的图形能满足需求,比如球,盒子,但是项目中涉及到点云的碰撞,而bullet中处理点云,没有找到好的处理方式。但是FCL可以将点云转变成fcl中对应的实体,因此最终选择了FCL进行碰撞检测,这里列出FCL中大概的步骤。
1,FCL中构造实体。这里构造了一个 盒子。
auto box_geometry = std::make_shared<fcl::Boxf>(w, d, h);
auto ob = new fcl::CollisionObjectf(box_geometry);
2,更新FCL实体的位姿矩阵。
void FCLManager::updateTrans(const std::string &name, const fcl::Transform3f &trans)
{
    fcl::CollisionObjectf *ob=getCollisionObject(name);
    if(ob){
        ob->setTransform(trans);
    }
}

//OSG 矩阵 需要进行转换 才能给到FCL使用
//osg 矩阵转fcl矩阵
osg::Vec3 osgTrans = mt.getTrans(); // 获取平移分量
osg::Quat osgQuat = mt.getRotate(); // 获取旋转分量

fcl::Quaternionf rotation(osgQuat.w(), osgQuat.x(), osgQuat.y(), osgQuat.z());
fcl::Vector3f translation(osgTrans.x(), osgTrans.y(), osgTrans.z());
fcl::Transform3f fclTrans=fcl::Transform3f::Identity();
fclTrans.translation() = translation;
fclTrans.linear()=rotation.toRotationMatrix();
FCLManager::getInstance()->updateTrans(this->getName(),fclTrans);
3,碰撞检测
我是检测机器人和其它障碍物的碰撞,这里把机器人关节放到一个集合中,把其它障碍物放到另一个集合中
bool FCLManager::detectCollision()
{
    fcl::CollisionRequestf request;
    fcl::CollisionResultf result;
    for(auto &ob1:jointMap){
        for(auto &ob2:obstacleMap){
            collide(ob1.second, ob2.second, request, result);
            if(result.isCollision()){
                return true;
            }
        }
    }
    return false;
}
4,FCL支持三角面检测。因此我们在FCL中构造对应实体的时候,可以直接用三角面。这样不管OSG中构造的时盒子还是球,还是导入的stl,对应FCL中都是统一用三角面处理。
void FCLManager::addTriMesh(const std::string &name, osg::Node *node)
{
     fcl::CollisionObjectf *obj = createNodeCollisionObject(node);
     obstacleMap.emplace(name,obj);
}

fcl::CollisionObjectf *FCLManager::createNodeCollisionObject(osg::Node *node)
{
    MyComputeTriMeshVisitor visitor;
    node->accept( visitor );
    osg::Vec3Array* vertices = visitor.getTriMesh();

    typedef fcl::BVHModel<fcl::OBBRSSf> Model;
    Model* model = new Model();
    std::shared_ptr<fcl::CollisionGeometryf> m1_ptr(model);
    model->beginModel();
    osg::Vec3 p1, p2, p3;
    for( size_t i = 0; i + 2 < vertices->size(); i += 3 )
    {
        p1 = vertices->at( i );
        p2 = vertices->at( i + 1 );
        p3 = vertices->at( i + 2 );

        fcl::Vector3<float> pp1{p1.x(),p1.y(),p1.z()};
        fcl::Vector3<float> pp2{p2.x(),p2.y(),p2.z()};
        fcl::Vector3<float> pp3{p3.x(),p3.y(),p3.z()};

        model->addTriangle(pp1, pp2, pp3);
    }
    model->endModel();
    model->computeLocalAABB();

    return new  fcl::CollisionObjectf(m1_ptr);
}
5,点云的碰撞。点云的碰撞 使用了一种叫做八叉树的算法。首先将点云转成pcl的点云 格式,然后可以直接构造出fcl实体,这也是选用FCL的原因。
fcl::CollisionObjectf* FCLManager::createPointCloudCollisionObject(const pcl::PointCloud<pcl::PointXYZ>::Ptr pointcloud_ptr, const octomap::point3d &origin_3d)
{
    // octomap octree settings
    const double resolution = 0.01;
    const double prob_hit = 0.9;
    const double prob_miss = 0.1;
    const double clamping_thres_min = 0.12;
    const double clamping_thres_max = 0.98;

    std::shared_ptr<octomap::OcTree> octomap_octree = std::make_shared<octomap::OcTree>(resolution);
    octomap_octree->setProbHit(prob_hit);
    octomap_octree->setProbMiss(prob_miss);
    octomap_octree->setClampingThresMin(clamping_thres_min);
    octomap_octree->setClampingThresMax(clamping_thres_max);

    octomap::KeySet free_cells;
    octomap::KeySet occupied_cells;

#if defined(_OPENMP)
#pragma omp parallel
#endif
    {
#if defined(_OPENMP)
        auto thread_id = omp_get_thread_num();
        auto thread_num = omp_get_num_threads();
#else
        int thread_id = 0;
        int thread_num = 1;
#endif
        int start_idx = static_cast<int>(pointcloud_ptr->size() / thread_num) * thread_id;
        int end_idx = static_cast<int>(pointcloud_ptr->size() / thread_num) * (thread_id + 1);
        if (thread_id == thread_num - 1)
        {
            end_idx = pointcloud_ptr->size();
        }

        octomap::KeySet local_free_cells;
        octomap::KeySet local_occupied_cells;

        for (auto i = start_idx; i < end_idx; i++)
        {
            octomap::point3d point((*pointcloud_ptr)[i].x, (*pointcloud_ptr)[i].y, (*pointcloud_ptr)[i].z);
            octomap::KeyRay key_ray;
            if (octomap_octree->computeRayKeys(origin_3d, point, key_ray))
            {
                local_free_cells.insert(key_ray.begin(), key_ray.end());
            }

            octomap::OcTreeKey tree_key;
            if (octomap_octree->coordToKeyChecked(point, tree_key))
            {
                local_occupied_cells.insert(tree_key);
            }
        }

#if defined(_OPENMP)
#pragma omp critical
#endif
        {
            free_cells.insert(local_free_cells.begin(), local_free_cells.end());
            occupied_cells.insert(local_occupied_cells.begin(), local_occupied_cells.end());
        }
    }

    // free cells only if not occupied in this cloud
    for (auto it = free_cells.begin(); it != free_cells.end(); ++it)
    {
        if (occupied_cells.find(*it) == occupied_cells.end())
        {
            octomap_octree->updateNode(*it, false);
        }
    }

    // occupied cells
    for (auto it = occupied_cells.begin(); it != occupied_cells.end(); ++it)
    {
        octomap_octree->updateNode(*it, true);
    }

    auto fcl_octree = std::make_shared<fcl::OcTree<float>>(octomap_octree);
    std::shared_ptr<fcl::CollisionGeometryf> fcl_geometry = fcl_octree;
    return new fcl::CollisionObjectf(fcl_geometry);
}
四,总结
OSG结合FCL实现碰撞的检测,首先将OSG中的Node 转换成FCL中的三角面。然后将点云用上述方式进行转换。最后调用result.isCollision()函数 来判断两个实体是否发生碰撞。
一些对象是全局唯一的,特别适合使用单列模式,比如网络,数据库,或者跟设备相关的功能,如串口,plc等,因此在QML中访问C++的单列,就很有必要。
一,C++单例
以一个相机操作为例,这里只列出只要功能。
class ImageHandle : public QThread
{
    Q_OBJECT

public:
    //单例模式的声明
    static ImageHandle* instance(){
        static ImageHandle manager;
        return &manager;
    }

    //给QML调用的接口
    Q_INVOKABLE void startPreview();

private:
    explicit ImageHandle(QObject *parent = nullptr);
    ~ImageHandle();

};
二,main.cpp 中注册单列,这样才能在QML中使用。
一共两步,一步定义一个函数(configureProvider),还有一步是利用qmlRegisterSingletonType注册
#include <QGuiApplication>
#include <QQmlApplicationEngine>
#include <QIcon>
#include "comm/imageHandle.h"

//单例的使用
static QObject *configureProvider(QQmlEngine *engine, QJSEngine *scriptEngine)
{
    Q_UNUSED(engine)
    Q_UNUSED(scriptEngine)
    return ImageHandle::instance();
}

int main(int argc, char *argv[])
{
    QGuiApplication::setAttribute(Qt::AA_UseHighDpiPixmaps);
    QGuiApplication::setAttribute(Qt::AA_Use96Dpi);

    QGuiApplication app(argc, argv);

     //单例的使用
    qmlRegisterSingletonType<ImageHandle>("ImageHandle",1,0,"ImageHandle",configureProvider);

    QQmlApplicationEngine engine;
    const QUrl url(QStringLiteral("qrc:/main.qml"));
    QObject::connect(&engine, &QQmlApplicationEngine::objectCreated,
                     &app, [url](QObject *obj, const QUrl &objUrl) {
        if (!obj && url == objUrl)
            QCoreApplication::exit(-1);
    }, Qt::QueuedConnection);
    engine.load(url);

    return app.exec();
}
三,QML中使用
import 导入后 就可以直接使用了。
QML写界面,业务逻辑使用C++,既能快速的开发界面也能利用C++的强大生态,这是目前比较被认可的方式,那就涉及到QML与C++对象的交互。
我们以登录例子来说明,页面点击登录,将信息传递到c++ http对象进行密码的验证,然后返回登录结果。
一,调用C++中的函数
1,普通C++类
#ifndef HTTPHANDLER_H
#define HTTPHANDLER_H

#include <QObject>
class HTTPHandler:public QObject{
    Q_OBJECT
public:
    HTTPHandler(QObject* parent=0):QObject(parent){

    }
    //登录接口 验证用户名 和密码
    Q_INVOKABLE bool login(QString name,QString pwd){
        if(name=="admin"&&pwd=="123"){
            return true;
        }else{
            return false;
        }
    }
};
#endif // HTTPHANDLER_H
2,注册C++ 类
main.cpp注册此 C++ 类型,这样QML中就能使用了。
#include <QGuiApplication>
#include <QQmlApplicationEngine>
#include "HTTPHandler.h"

int main(int argc, char *argv[])
{
#if QT_VERSION < QT_VERSION_CHECK(6, 0, 0)
    QCoreApplication::setAttribute(Qt::AA_EnableHighDpiScaling);
#endif
    QGuiApplication app(argc, argv);

    //注册类型
    qmlRegisterType<HTTPHandler>("HTTPHandler", 1, 0, "HTTPHandler");


    QQmlApplicationEngine engine;
    const QUrl url(QStringLiteral("qrc:/main.qml"));
    QObject::connect(&engine, &QQmlApplicationEngine::objectCreated,
        &app, [url](QObject *obj, const QUrl &objUrl) {
            if (!obj && url == objUrl)
                QCoreApplication::exit(-1);
        }, Qt::QueuedConnection);
    engine.load(url);

    return app.exec();
}
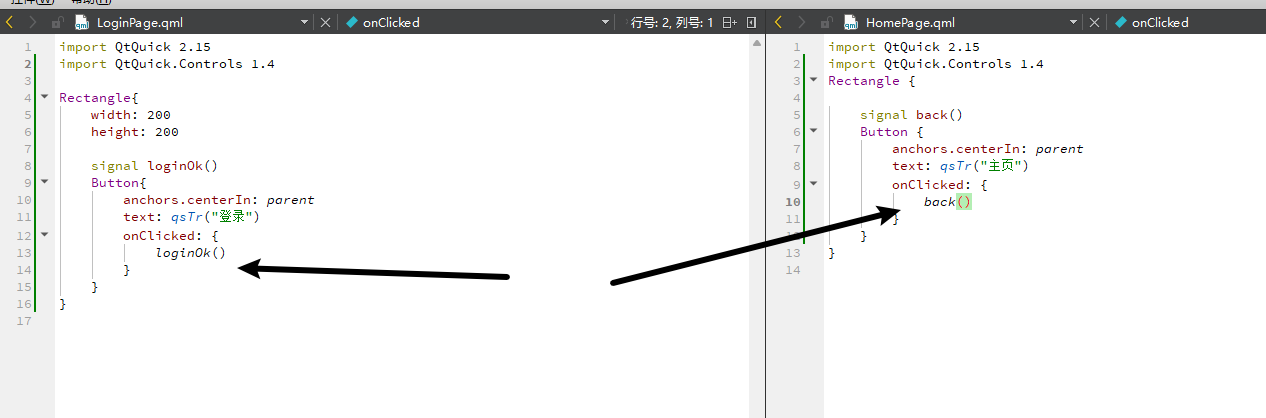
3,调用C++对象中的函数
只要是C++中 通过Q_INVOKABLE关键词声明的public函数,QML中都能访问。
import QtQuick 2.15
import QtQuick.Controls 1.4
//导入C++ 对象
import HTTPHandler 1.0

Rectangle{
    width: 200
    height: 200

    //相当于 实列化一个C++对象
    HTTPHandler{
        id:httpHandler
    }

    signal loginOk()
    Row{
        anchors.centerIn: parent
        TextField{
            id:name
        }
        TextField{
            id:pwd
        }
    }
    Button{
        anchors.bottom: parent.bottom
        text: qsTr("登录")
        onClicked: {
            //调用C++对象中的函数
            if(httpHandler.login(name.text,pwd.text)){
                loginOk()
            }
        }
    }
}
二,响应C++中的信号
上述方式相当于同步的方式调用C++中的函数,还可以异步的响应C++中的信号,相当于QML中的槽与C++中的信号进行绑定。
1,C++类
#ifndef HTTPHANDLER_H
#define HTTPHANDLER_H

#include <QObject>
class HTTPHandler:public QObject{
    Q_OBJECT
public:
    HTTPHandler(QObject* parent=0):QObject(parent){

    }

    Q_INVOKABLE void login(QString name,QString pwd){
        if(name=="admin"&&pwd=="123"){
            //验证成功后 激发信号
            emit loginSuccess();
        }
    }

signals:
    //登录成功信号
    void loginSuccess();
};
#endif // HTTPHANDLER_H
2,响应C++信号
import QtQuick 2.15
import QtQuick.Controls 1.4
import HTTPHandler 1.0

Rectangle{
    width: 200
    height: 200

    //相当于 实列化一个C++对象
    HTTPHandler{
        id:httpHandler
        //绑定C++信号
        onLoginSuccess: {
            loginOk()
        }
    }

    signal loginOk()
    Row{
        anchors.centerIn: parent
        TextField{
            id:name
        }
        TextField{
            id:pwd
        }
    }
    Button{
        anchors.bottom: parent.bottom
        text: qsTr("登录")
        onClicked: {
            //调用C++对象中的函数
            httpHandler.login(name.text,pwd.text)

        }
    }
}
三,绑定C++中的属性
还可以直接在C++定义属性,然后QML绑定此属性,适合实时的传递一些状态数据。
1,C++类
#ifndef HTTPHANDLER_H
#define HTTPHANDLER_H

#include <QObject>
class HTTPHandler:public QObject{
    Q_OBJECT
    //注册属性
    Q_PROPERTY(QString status READ getStatus WRITE setStatus NOTIFY statusChanged FINAL)

public:
    HTTPHandler(QObject* parent=0):QObject(parent){

    }

    Q_INVOKABLE bool login(QString name,QString pwd){
        if(name=="admin"&&pwd=="123"){
            return true;
        }else{
            //设置状态信息
            setStatus("pwd or name error");
        }
    }

    QString getStatus() const;
    void setStatus(const QString &newStatus);

signals:
    void statusChanged();

private:
    //状态信息
    QString status;
};

inline QString HTTPHandler::getStatus() const
{
    return status;
}

inline void HTTPHandler::setStatus(const QString &newStatus)
{
    if (status == newStatus)
        return;
    status = newStatus;
    emit statusChanged();
}


#endif // HTTPHANDLER_H
2,绑定属性
import QtQuick 2.15
import QtQuick.Controls 1.4
import HTTPHandler 1.0

Rectangle{
    width: 200
    height: 200

    //相当于 实列化一个C++对象
    HTTPHandler{
        id:httpHandler
    }

    signal loginOk()
    Row{
        anchors.centerIn: parent
        TextField{
            id:name
        }
        TextField{
            id:pwd
        }
    }

    //定义一个文本框 直接绑定C++的属性
    Text {
        anchors.top: parent.top
        text: httpHandler.status
    }
    Button{
        anchors.bottom: parent.bottom
        text: qsTr("登录")
        onClicked: {
            //调用C++对象中的函数
            if(httpHandler.login(name.text,pwd.text)){
                loginOk()
            }
        }
    }
}
3,看下效果
点击登录 ,如果密码或用户名错误会将C++的状态信息,实时的显示到左上角的QML Text控件中。
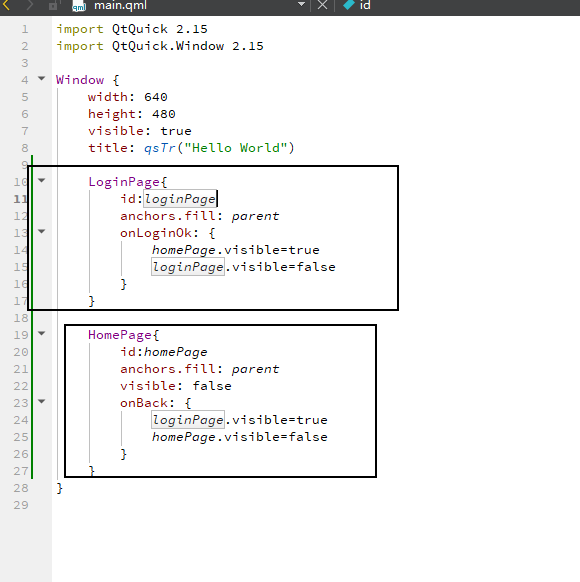
整理下QML中页面切换的两种方式,这里以常见的登录为例,分为两个页面。登录页和主页,软件起来首先呈现登录页,点击登录进入主页,点击退出 返回到登录页。
一,隐藏的方式
1.效果
2.定义两个页面(登录页,和首页),并定义登录成功和返回信号。当点击登录时,激发登录成功信号,点击退出时 激发返回信号。
3.main.qml中对两个信号进行处理。分别隐藏和显示不同的页面。
二,动态加载的方式
用Loader占位,然后动态加载组件。类似先定义一个指针,然后根据需要指向不同的内存。

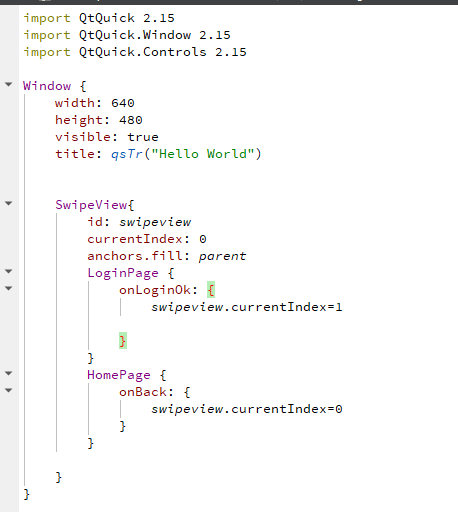
三,SwipeView方式
这种相当于把页面都放到了一个容器里,然后滑动切换。
四,总结
1与3类似。当页面构造时,如果需要同时开辟很大的内存,此时建议用1,3的方式,提前把内存开辟好,这样页面页会加载的快一些。
一,需求
QML中实现自定义的Switch。
二,效果
三,实现
这个要用以前的版本。
import QtQuick.Controls 1.4 as PreControl
import QtQuick.Controls.Styles 1.4
PreControl.Switch{
                    id:lightSwidch
                    height: 26
                    anchors.verticalCenter: parent.verticalCenter
                    style: SwitchStyle {
                        groove: Rectangle {
                            width: 57
                            height: 26
                            radius: 13
                            color: lightSwidch.checked?"#3F64EB":"#414850"
                        }
                        handle: Rectangle{
                            width: 26
                            height: 26
                            radius: 13
                            color: "#FAFCFF"
                        }
                    }
                    onCheckedChanged: {

                    }
                }
一,需求
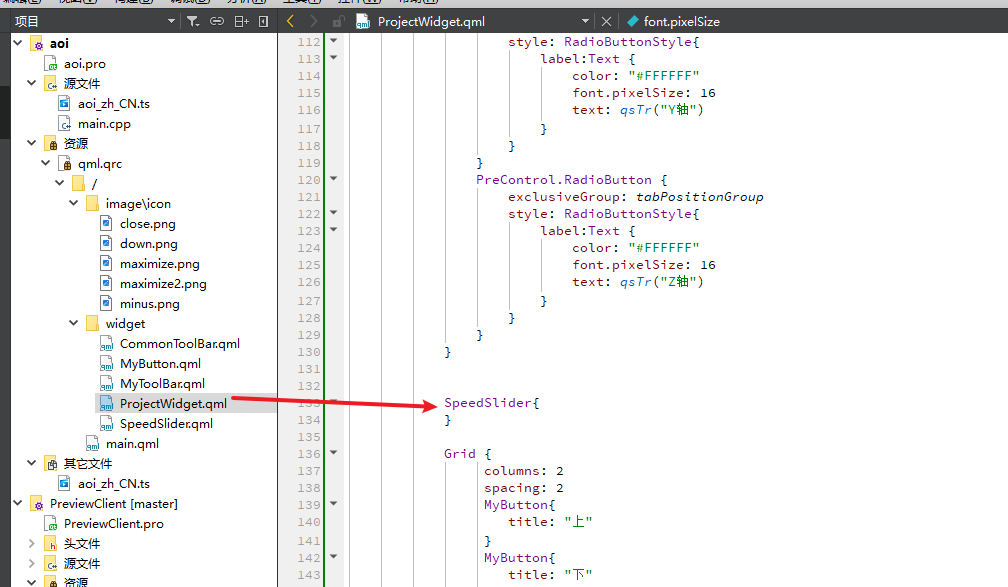
QML中实现自定义的Slider。
二,效果

三,实现
import QtQuick 2.12
import QtQuick.Controls 2.15

Item {
    id: root
    property int startval: 0
    property int endval: 100
    property int sliderWidth: 200

    implicitHeight: control.height + label.height
    implicitWidth: sliderWidth

    Rectangle {
        color: Qt.rgba(0,0,0,0)
        width: root.width
        height: root.height
    }
    Slider {
        id: control
        stepSize: 1
        anchors.centerIn: parent
        snapMode: Slider.SnapOnRelease
        width: root.sliderWidth
        from: root.startval
        to: root.endval
        handle: Rectangle {
            id: handleId
            x: control.visualPosition * (control.width - width)
            y: (control.height - height) / 2
            width: 20
            height: 20
            radius: 20
            color: "#FFFFFF"
        }

        // background: Rectangle {
        //     y: (control.height - height) / 2
        //     height: 4
        //     radius: 2
        //     color: "green"

        //     Rectangle {
        //         width: control.visualPosition * parent.width
        //         height: parent.height
        //         color: "red"
        //         radius: 2
        //     }
        // }
    }

    Label {
        id: label
        width: 20
        height: 20
        text: control.value
        font.pixelSize: 15
        color: "#FFFFFF"
        x: handleId.x + control.x
        y: handleId.y - 10
        Rectangle {
            color: Qt.rgba(0,0,0,0)
            anchors.fill: parent
            opacity: 0.3
        }
    }
}
四,使用
一,需求
利用QML实现无边框窗体,要求可移动,可缩放。
二,效果

三,实现
//主窗体
import QtQuick 2.12
import QtQuick.Controls 2.3
import QtQuick.Window 2.3

import "./widget"

Window  {
    id: window
    visible: true
    flags: Qt.FramelessWindowHint|Qt.Window
    width: 1024
    height: 768
    color: "#0F1013"
    property int bw: 3

    //改变鼠标形状
    MouseArea {
        anchors.fill: parent
        hoverEnabled: true
        cursorShape: {
            const p = Qt.point(mouseX, mouseY)
            const b = bw + 10
            if (p.x < b && p.y < b) return Qt.SizeFDiagCursor
            if (p.x >= width - b && p.y >= height - b) return Qt.SizeFDiagCursor
            if (p.x >= width - b && p.y < b) return Qt.SizeBDiagCursor
            if (p.x < b && p.y >= height - b) return Qt.SizeBDiagCursor
            if (p.x < b || p.x >= width - b) return Qt.SizeHorCursor
            if (p.y < b || p.y >= height - b) return Qt.SizeVerCursor
        }
        acceptedButtons: Qt.NoButton
    }

    DragHandler {
        id: resizeHandler
        grabPermissions: TapHandler.TakeOverForbidden
        target: null
        onActiveChanged: if (active) {
            const p = resizeHandler.centroid.position
            const b = bw + 10
            let e = 0;
            if (p.x < b) { e |= Qt.LeftEdge }
            if (p.x >= width - b) { e |= Qt.RightEdge }
            if (p.y < b) { e |= Qt.TopEdge }
            if (p.y >= height - b) { e |= Qt.BottomEdge }
            window.startSystemResize(e);
        }
    }

    MyToolBar{
        window:window
    }
}
//工具栏
import QtQuick 2.12
import QtQuick.Controls 2.3
import QtQuick.Window 2.3

ToolBar {
    height: 50
    anchors.top: parent.top
    anchors.left: parent.left
    anchors.right: parent.right
    x:bw
    y:bw

    property var window: null
    //关闭 最大化 最小化按钮
    function toggleMaximized(mode) {
        if(mode===0){
            if (window.visibility === Window.Maximized) {
                window.showNormal();
            } else {
                window.showMaximized();
            }
        }else if(mode===1){
            window.showMinimized()
        }else if(mode===2){
            window.close()
        }else if(mode===4){
            return window.visibility
        }

    }

    Rectangle{
        id:rectBk
        anchors.fill: parent
        color: "#1F2025"
        MouseArea {
            anchors.fill: parent
            acceptedButtons: Qt.LeftButton
            property point clickPos: "0,0"
            onPressed: {
                clickPos = Qt.point(mouse.x, mouse.y)
            }
            onDoubleClicked: {
                toggleMaximized(0)
            }
            onPositionChanged: {
                //鼠标偏移量
                var delta = Qt.point(mouse.x-clickPos.x, mouse.y-clickPos.y)

                window.setX(window.x+delta.x)
                window.setY(window.y+delta.y)
            }
        }
    }

    Row{
        anchors.right: parent.right
        anchors.top: parent.top
        anchors.bottom: parent.bottom
        spacing: 0
        Rectangle{
            width: 50
            height: 50
            color: Qt.rgba(0,0,0,0)
            Image {
                anchors.centerIn: parent
                id: min
                source: "qrc:/image/icon/minus.png"
                width: 26
                height: 26
            }
            MouseArea{
                anchors.fill: parent
                hoverEnabled: true
                onClicked: {
                    toggleMaximized(1)
                }
                onEntered: {
                    parent.color = "#454B57"
                }

                onExited: {
                    parent.color = Qt.rgba(0,0,0,0)
                }
            }
        }

        Rectangle{
            width: 50
            height: 50
            color: Qt.rgba(0,0,0,0)
            Image {
                id: max
                source: (toggleMaximized(4) === Window.Maximized)?"qrc:/image/icon/maximize.png":"qrc:/image/icon/maximize2.png"
                anchors.centerIn: parent
                width: 26
                height: 26
            }
            MouseArea{
                anchors.fill: parent
                hoverEnabled: true
                onClicked: {
                    console.log("max")
                    toggleMaximized(0)
                }
                onEntered: {
                    parent.color = "#454B57"
                }
                onExited: {
                    parent.color = Qt.rgba(0,0,0,0)
                }
            }
        }

        Rectangle{
            width: 50
            height: 50
            color: Qt.rgba(0,0,0,0)
            Image {
                id: close
                source: "qrc:/image/icon/close.png"
                anchors.centerIn: parent
                width: 26
                height: 26
            }
            MouseArea{
                anchors.fill: parent
                hoverEnabled: true
                onClicked: {
                    toggleMaximized(2)
                }
                onEntered: {
                    parent.color = "#454B57"
                }

                onExited: {
                    parent.color = Qt.rgba(0,0,0,0)
                }
            }
        }

    }

    //标题
    Text {
        id:title
        anchors.left: parent.left
        anchors.verticalCenter:  parent.verticalCenter
        anchors.leftMargin: 20
        color: "#FFFFFF"
        font.pixelSize: 24
        text: qsTr("影像检测仪")
    }

    Menu {
        id:settingMenu
        x:setting.x
        y:setting.y+setting.height+1
        width: 120
        Action {
            text: qsTr("创建项目")
            onTriggered: console.log("创建项目")

        }
        Action {
            text: qsTr("编辑项目")
            onTriggered: console.log("编辑项目")
        }

        delegate: MenuBarItem {
            id: settingMenuItem
            height: 40
            width: 120

            contentItem: Text {
                text: settingMenuItem.text
                font.pixelSize: 16
                color:  "#ffffff"
                horizontalAlignment: Text.AlignHCenter
                verticalAlignment: Text.AlignVCenter
                elide: Text.ElideRight
            }

            background: Rectangle {
                implicitWidth: 120
                implicitHeight: 40
                color: Qt.rgba(0,0,0,0)
                MouseArea{
                    anchors.fill: parent
                    hoverEnabled: true
                    propagateComposedEvents: true
                    onClicked: {
                        settingMenu.close()
                        settingMenuItem.action.trigger()
                    }
                    onEntered: {
                        parent.color = "#454B57"
                    }

                    onExited: {
                        parent.color = Qt.rgba(0,0,0,0)
                    }
                }
            }
        }
        background: Rectangle {
            implicitWidth: 150
            implicitHeight: 40
            color: "#1F2025"
        }
    }

    //设置
    Rectangle{
        id:setting
        anchors.top: parent.top
        anchors.bottom: parent.bottom
        anchors.left:title.right
        anchors.leftMargin: 100
        color: Qt.rgba(0,0,0,0)
        width: 100

        Row{
            anchors.centerIn: parent
            spacing: 2
            Text {
                color: "#FFFFFF"
                font.pixelSize: 20
                text: qsTr("设置")
                verticalAlignment: Text.AlignVCenter
                anchors.verticalCenter: parent.verticalCenter
            }
            Image {
                width: 32
                height: 32
                anchors.verticalCenter: parent.verticalCenter
                source: "qrc:/image/icon/down.png"
            }
        }
        MouseArea{
            anchors.fill: parent
            hoverEnabled: true
            propagateComposedEvents: true
            onClicked: {
                settingMenu.open()
            }
            onEntered: {
                parent.color = "#454B57"
            }

            onExited: {
                parent.color = Qt.rgba(0,0,0,0)
            }
        }

    }

    //关于菜单
    Menu {
        id:aboutMenu
        x:about.x
        y:about.y+about.height+1
        width: 120
        Action {
            text: qsTr("关于这个")
            onTriggered: console.log("关于这个")
        }
        Action {
            text: qsTr("关于那个")
            onTriggered: console.log("关于那个")
        }

        delegate: MenuBarItem {
            id: aboutMenuItem
            height: 40
            width: 120

            contentItem: Text {
                text: aboutMenuItem.text
                font.pixelSize: 16
                color:  "#ffffff"
                horizontalAlignment: Text.AlignHCenter
                verticalAlignment: Text.AlignVCenter
                elide: Text.ElideRight
            }

            background: Rectangle {
                implicitWidth: 120
                implicitHeight: 40
                color: Qt.rgba(0,0,0,0)
                MouseArea{
                    anchors.fill: parent
                    hoverEnabled: true
                    propagateComposedEvents: true
                    onClicked: {
                        aboutMenu.close()
                        aboutMenuItem.action.trigger()
                    }
                    onEntered: {
                        parent.color = "#454B57"
                    }

                    onExited: {
                        parent.color = Qt.rgba(0,0,0,0)
                    }
                }

            }

        }
        background: Rectangle {
            implicitWidth: 150
            implicitHeight: 40
            color: "#1F2025"
        }
    }
    //关于
    Rectangle{
        id:about
        anchors.top: parent.top
        anchors.bottom: parent.bottom
        anchors.left:setting.right
        color: Qt.rgba(0,0,0,0)
        width: 100

        Row{
            anchors.centerIn: parent
            spacing: 2
            Text {
                color: "#FFFFFF"
                font.pixelSize: 20
                text: qsTr("关于")
                verticalAlignment: Text.AlignVCenter
                anchors.verticalCenter: parent.verticalCenter
            }
            Image {
                width: 32
                height: 32
                anchors.verticalCenter: parent.verticalCenter
                source: "qrc:/image/icon/down.png"
            }
        }
        MouseArea{
            anchors.fill: parent
            hoverEnabled: true
            propagateComposedEvents: true
            onClicked: {
                aboutMenu.open()
            }
            onEntered: {
                parent.color = "#454B57"
            }

            onExited: {
                parent.color = Qt.rgba(0,0,0,0)
            }
        }

    }
}
一. 需求
利用Qt自带的媒体模块,播放mp4等媒体文件。
二. 实现
QT += core gui multimedia multimediawidgets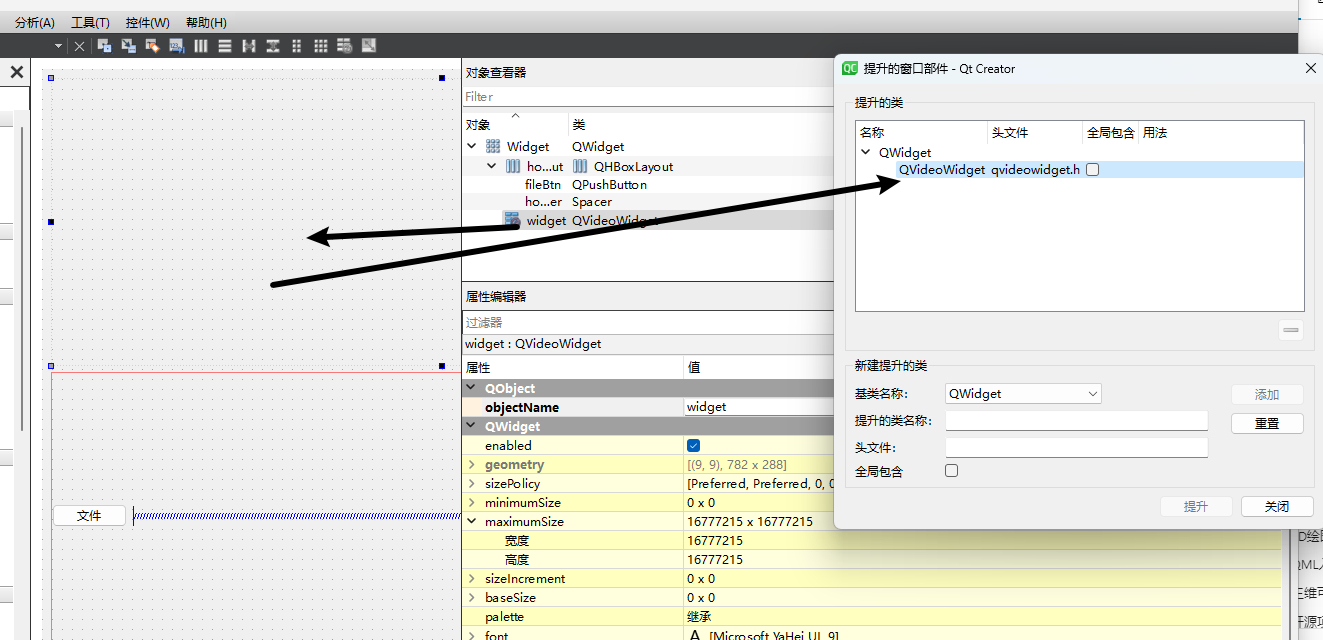
#ifndef WIDGET_H
#define WIDGET_H

#include <QWidget>

#include <QMediaPlayer>
#include <QVideoWidget>
#include <QMediaPlaylist>

QT_BEGIN_NAMESPACE
namespace Ui { class Widget; }
QT_END_NAMESPACE

class Widget : public QWidget
{
    Q_OBJECT

public:
    Widget(QWidget *parent = nullptr);
    ~Widget();

private slots:
    void on_fileBtn_clicked();

private:
    Ui::Widget *ui;
    QMediaPlayer* mediaPlayer;
    QMediaPlaylist* mediaPlayList;
};
#endif // WIDGET_H
#include "widget.h"
#include "ui_widget.h"

#include <QFileDialog>

Widget::Widget(QWidget *parent)
    : QWidget(parent)
    , ui(new Ui::Widget)
{
    ui->setupUi(this);

    mediaPlayer = new QMediaPlayer(this);
    mediaPlayList = new QMediaPlaylist(mediaPlayer);
    mediaPlayer->setVideoOutput(ui->widget);
}

Widget::~Widget()
{
    delete ui;
}


void Widget::on_fileBtn_clicked()
{
    QString file = QFileDialog::getOpenFileName(this,"open file",".","*.*");
    if(file.isEmpty())
        return;

    mediaPlayList->clear();
    mediaPlayList->addMedia(QUrl::fromLocalFile(file));
    mediaPlayList->setCurrentIndex(0);
    mediaPlayer->setPlaylist(mediaPlayList);
    mediaPlayer->play();
}
https://www.codecguide.com/download_kl.htm
不然会出现如下错误: DirectShowPlayerService::doRender: Unresolved error code 0x80040266
三. 效果

一. 需求
利用VTK自带的包围盒实现简单的碰撞检测。
二. 实现
1, VTK的碰撞检测原理就是 求物体的包围盒,然后检测包围盒与线、面、或者另一个包围盒是否相交。包围盒主要包括球体、轴对齐包围盒(AABB)、有向包围盒(OBB)和凸包(Convex Hull),参考(VTK笔记——轴对齐包围盒(AABB) – 灰信网(软件开发博客聚合))
2,VTK自带了一个vtkCollisionDetectionFilter过滤器,来计算碰撞检测,此过滤器利用的就是OBB包围盒,使用简单,只需提供两个物体的数据集和矩阵即可。
3,实现的时候 利用一个结构体,来定义角色,矩阵和包围盒。这样便于计算。
struct  SimulateActor
{
    using Ptr =  QSharedPointer<SimulateActor>;
    vtkSmartPointer<vtkActor> Actor;
    vtkSmartPointer<vtkTransform> Trans;
    vtkSmartPointer<vtkPolyData> PolyData;
    vtkSmartPointer<vtkCollisionDetectionFilter> Collide;
};
4,先初始化之后所有的物体。然后利用两个循环来依次判断每两个物体是否发生碰撞。
5,不足
(1),此过滤器只能检测两个物体是否发生碰撞,无奈当前只能通过两个循环来进行遍历。
(2),没有找到如何将多个actor组合成一个,然后进行碰撞检测的方法,如果能组合成一个效率会提高很多。
(3),目前六个部件,与50个障碍物进行碰撞检测。检测一次的时间大约50ms。
一. 需求
利用VTK实现一个可移动,可旋转的三维坐标轴。并通过回调获取其位姿。
二. 效果
三. 步骤
vtkMovableAxesRepresentation::vtkMovableAxesRepresentation()
{
  // The initial state
  this->InteractionState = vtkMovableAxesRepresentation::Outside;

  // Handle size is in pixels for this widget
  this->HandleSize = 5.0;

  // Control orientation of normals
  this->InsideOut = 0;

  // Set up the initial properties
  this->CreateDefaultProperties();

  // Define the point coordinates
  double bounds[6];
  bounds[0] = -0.5;
  bounds[1] = 0.5;
  bounds[2] = -0.5;
  bounds[3] = 0.5;
  bounds[4] = -0.5;
  bounds[5] = 0.5;
  // Points 8-14 are down by PositionHandles();
  this->BoundingBox = vtkBox::New();
  this->PlaceWidget(bounds);

  //画 圆
  this->AxisCircel = new vtkActor* [3];
  this->AxisPolygonSource = new vtkRegularPolygonSource* [3];
  this->AxisCircleMapper = new vtkPolyDataMapper*[3];
  for(auto i=0;i<3;i++){
      this->AxisCircel[i]=vtkActor::New();
      this->AxisPolygonSource[i] = vtkRegularPolygonSource::New();
      this->AxisCircleMapper[i] = vtkPolyDataMapper::New();

      this->AxisPolygonSource[i]->SetNumberOfSides(100);    //多边形边数
      this->AxisPolygonSource[i]->SetRadius(g_circleRadius);       //半径
      this->AxisPolygonSource[i]->SetCenter(0, 0, 0);      //圆心

      this->AxisCircleMapper[i]->SetInputConnection(this->AxisPolygonSource[i]->GetOutputPort());
      this->AxisCircel[i]->SetMapper(this->AxisCircleMapper[i]);
      this->AxisCircel[i]->GetProperty()->SetOpacity(1);    //透明度
      this->AxisCircel[i]->GetProperty()->SetLineWidth(g_circleLineWidth);
      this->AxisCircel[i]->GetProperty()->SetRepresentationToWireframe();//图形不填充,只要边框
      this->AxisCircel[i]->GetProperty()->SetColor(g_normalColor[i][0],g_normalColor[i][1],g_normalColor[i][2]);    //颜色


      vtkNew<vtkMatrix4x4> initMatrix;
      this->AxisCircel[i]->SetUserMatrix(initMatrix);
  }
  //圆形拾取
  this->CircelPicker = vtkCellPicker::New();
  this->CircelPicker->SetTolerance(0.001);
  for(int i=0;i<3;i++){
      this->CircelPicker->AddPickList(this->AxisCircel[i]);
  }
  this->CircelPicker->PickFromListOn();
  this->CurrentCircel=nullptr;

  //轴
  this->HandleAxis = new vtkAssembly* [3];
  for (int i=0; i<3; i++)
  {
      vtkNew<vtkLineSource> lineSource;
      vtkNew<vtkPolyDataMapper> lineMapper;
      vtkNew<vtkActor> lineActor;

      lineMapper->SetInputConnection(lineSource->GetOutputPort());
      lineActor->SetMapper(lineMapper);

      double point1[3];
      double point2[3];
      if(i==0){//x轴
          point1[0]=-g_axisLength;
          point1[1]=0;
          point1[2]=0;

          point2[0]=g_axisLength;
          point2[1]=0;
          point2[2]=0;
      }else if(i==1){//y轴
          point1[0]=0;
          point1[1]=-g_axisLength;
          point1[2]=0;

          point2[0]=0;
          point2[1]=g_axisLength;
          point2[2]=0;
      }else if(i==2){//z轴
          point1[0]=0;
          point1[1]=0;
          point1[2]=-g_axisLength;

          point2[0]=0;
          point2[1]=0;
          point2[2]=g_axisLength;
      }
      lineSource->SetPoint1(point1);
      lineSource->SetPoint2(point2);
      lineActor->GetProperty()->SetColor(g_normalColor[i][0],g_normalColor[i][1],g_normalColor[i][2]);
      lineActor->GetProperty()->SetLineWidth(g_axisLineWidth);

      //箭头
      vtkNew<vtkConeSource> coneSource1;
      vtkNew<vtkPolyDataMapper> coneMapper1;
      vtkNew<vtkActor> coneActor1;
      coneSource1->SetHeight( 0.2 );
      coneSource1->SetRadius( 0.04 );
      coneSource1->SetResolution( 10 );
      coneMapper1->SetInputConnection(coneSource1->GetOutputPort());
      coneActor1->SetMapper(coneMapper1);

      coneActor1->GetProperty()->SetColor(g_normalColor[i][0],g_normalColor[i][1],g_normalColor[i][2]);
      coneSource1->SetCenter(point2);

      if(i==0){//x轴

      }else if(i==1){//y轴
          coneActor1->SetOrigin(point2);
          coneActor1->RotateZ(90);
      }else if(i==2){//z轴
          coneActor1->SetOrigin(point2);
          coneActor1->RotateY(-90);
      }
      //
      vtkNew<vtkConeSource> coneSource2;
      vtkNew<vtkPolyDataMapper> coneMapper2;
      vtkNew<vtkActor> coneActor2;
      coneSource2->SetHeight( 0.2 );
      coneSource2->SetRadius( 0.04 );
      coneSource2->SetResolution( 30 );
      coneMapper2->SetInputConnection(coneSource2->GetOutputPort());
      coneActor2->SetMapper(coneMapper2);

      coneActor2->GetProperty()->SetColor(g_normalColor[i][0],g_normalColor[i][1],g_normalColor[i][2]);
      coneSource2->SetCenter(point1);

      if(i==0){//x轴
          coneActor2->SetOrigin(point1);
          coneActor2->RotateY(180);

          this->AxisPolygonSource[i]->SetNormal(1,0,0);
      }else if(i==1){//y轴
          coneActor2->SetOrigin(point1);
          coneActor2->RotateZ(-90);

          this->AxisPolygonSource[i]->SetNormal(0,1,0);
      }else if(i==2){//z轴
          coneActor2->SetOrigin(point1);
          coneActor2->RotateY(90);

          this->AxisPolygonSource[i]->SetNormal(0,0,1);
      }

      this->HandleAxis[i] = vtkAssembly::New();
      this->HandleAxis[i]->AddPart(lineActor);
      this->HandleAxis[i]->AddPart(coneActor1);
      this->HandleAxis[i]->AddPart(coneActor2);

      vtkNew<vtkMatrix4x4> initMatrix;
      this->HandleAxis[i]->SetUserMatrix(initMatrix);
  }

  //坐标轴拾取
  this->AxisPicker = vtkCellPicker::New();
  this->AxisPicker->SetTolerance(0.001);
  for (int i=0; i<3; i++)
  {
      this->AxisPicker->AddPickList(this->HandleAxis[i]);
  }
  this->AxisPicker->PickFromListOn();
  //

  // Internal data members for performance
  this->Transform = vtkTransform::New();
  this->PlanePoints = vtkPoints::New(VTK_DOUBLE);
  this->PlanePoints->SetNumberOfPoints(6);
  this->PlaneNormals = vtkDoubleArray::New();
  this->PlaneNormals->SetNumberOfComponents(3);
  this->PlaneNormals->SetNumberOfTuples(6);
  this->Matrix = vtkMatrix4x4::New();

}
2. 实现轴和圈的互动,以旋转为例。
void vtkMovableAxesRepresentation::Rotate(int X, int Y, double *p1, double *p2, double *vpn, int singleAxis)
{
    for(int i=0;i<3;i++){
        vtkMatrix4x4 *origin_matrixCircle = this->AxisCircel[i]->GetUserMatrix();
        vtkNew<vtkMatrix4x4> result_matrixCircle;
        RotateByMatrix(origin_matrixCircle,p1,p2,singleAxis,result_matrixCircle);
        this->AxisCircel[i]->SetUserMatrix(result_matrixCircle);

        vtkMatrix4x4 *origin_matrixAxis = this->HandleAxis[i]->GetUserMatrix();
        vtkNew<vtkMatrix4x4> result_matrixAxis;
        RotateByMatrix(origin_matrixAxis,p1,p2,singleAxis,result_matrixAxis);
        this->HandleAxis[i]->SetUserMatrix(result_matrixAxis);
    }
    this->Modified();
    this->BuildRepresentation();
}
void vtkMovableAxesRepresentation::RotateByMatrix(vtkMatrix4x4 *origin_matrix, double *p1, double *p2,int direction,vtkMatrix4x4* result_matrix)
{
// 将鼠标位置移动到自身坐标系下,求两次鼠标位置向量在投影平面的夹角
vtkNew<vtkTransform> trans;
trans->SetMatrix(origin_matrix);
double pos_t1[4] { p1[0], p1[1], p1[2], 1 };
double pos_t2[4] { p2[0], p2[1], p2[2], 1 };
vtkNew<vtkMatrix4x4> posture_inv;
vtkMatrix4x4::Invert(origin_matrix, posture_inv);
auto pos_t = posture_inv->MultiplyDoublePoint(pos_t1);
double v1[3] = { pos_t[0], pos_t[1], pos_t[2] };
pos_t = posture_inv->MultiplyDoublePoint(pos_t2);
double v2[3] = { pos_t[0], pos_t[1], pos_t[2] };
double normal[3];
if(direction==0){
normal[0] = 1;
normal[1] = 0;
normal[2] = 0;
}else if(direction==1){
normal[0] = 0;
normal[1] = 1;
normal[2] = 0;
}else if(direction==2){
normal[0] = 0;
normal[1] = 0;
normal[2] = 1;
}
double projection1[3], projection2[3];
GetPlaneProjection(normal, v1, projection1);
GetPlaneProjection(normal, v2, projection2);
vtkMath::Normalize(projection1);
vtkMath::Normalize(projection2);
double axis[3];
vtkMath::Cross(projection1, projection2, axis);
double radians = acos(vtkMath::Dot(projection1, projection2));
double degrees = vtkMath::DegreesFromRadians(radians);
trans->RotateWXYZ(degrees, axis);
result_matrix->DeepCopy(trans->GetMatrix());
}3,感谢网友的分享。
https://blog.csdn.net/a15005784320/article/details/122096432
一. 需求
集成snap7库,对西门子plc进行访问。
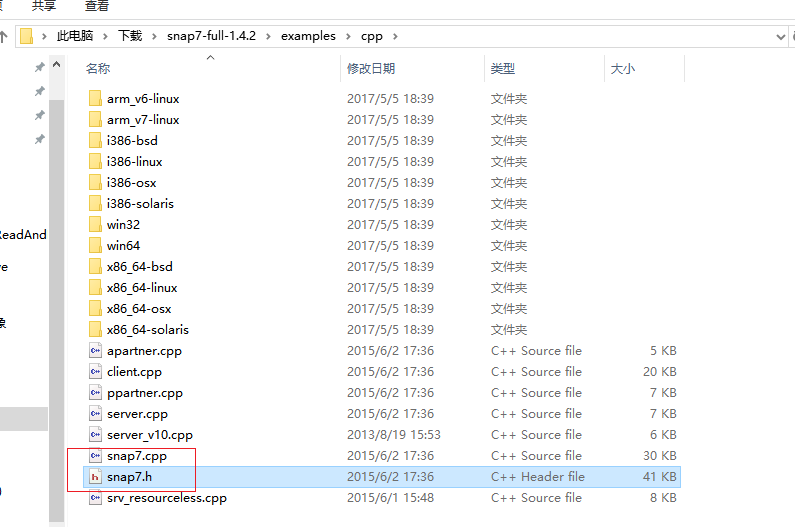
二. 步骤
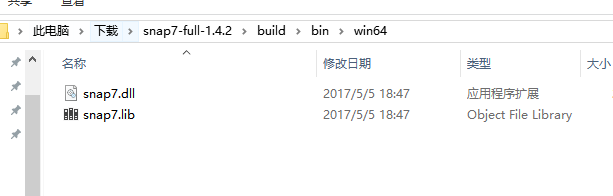
2. 把examples/cpp 下的 snap7.h 和cpp 加到工程里。
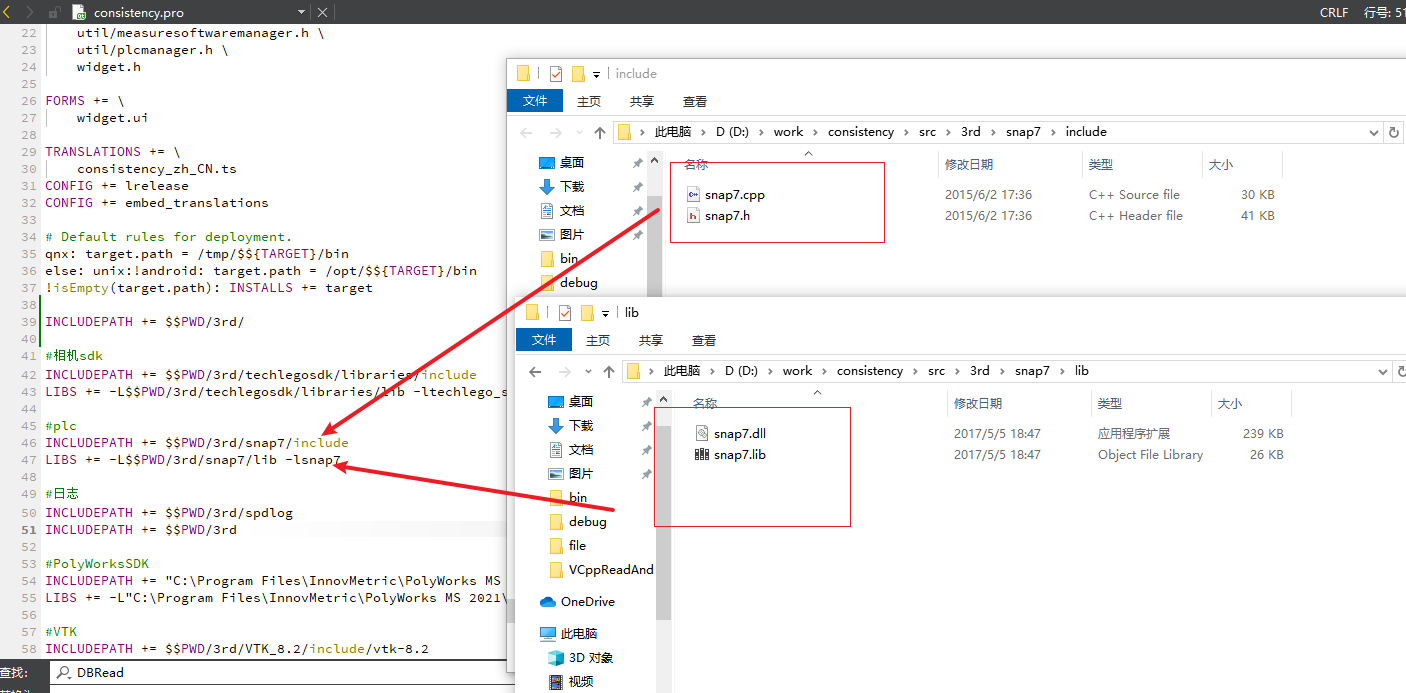
3. 封装一个单例 来使用 这个库。
#ifndef PLCMANAGER_H
#define PLCMANAGER_H

#include <QObject>
#include <snap7.h>

class PLCManager : public QObject
{
    Q_OBJECT
public:
    static PLCManager& getInstance() {
        static PLCManager instance;
        return instance;
    }
    PLCManager(const PLCManager&) = delete;
    PLCManager& operator=(const PLCManager&) = delete;

    //连接plc
    int connect(QString ip);
    //设置转台角度
    int setTurntableAngle(float value);

private:
    explicit PLCManager(QObject *parent = nullptr);
    ~PLCManager();

signals:

private:
    std::shared_ptr<TS7Client> client;
    bool bConnected{false};
};

#endif // PLCMANAGER_H
#include "plcmanager.h"

PLCManager::PLCManager(QObject *parent)
    : QObject{parent}
{
    client = std::make_shared<TS7Client>();
}

PLCManager::~PLCManager()
{

}

int PLCManager::connect(QString ip)
{
    int ret = client->ConnectTo(ip.toStdString().data(),0,1);
    if(ret==0){
        bConnected=true;
    }else{
        bConnected=false;
    }
    return ret;
}

int PLCManager::setTurntableAngle(float value)
{
    if(!bConnected)
        return -1;

    //测试
    byte bufferWrite[1]={1};

    client->MBWrite(100,1,&bufferWrite);
}
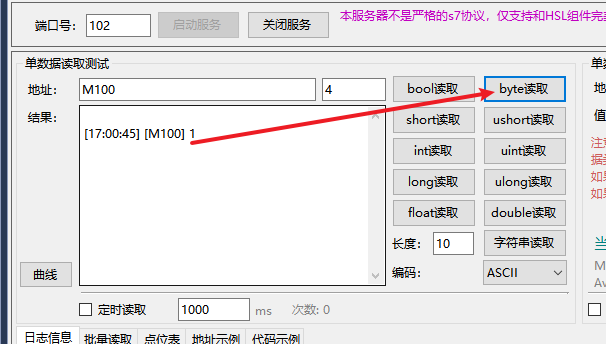
4. 使用的时候 直接调用业务函数。
   PLCManager::getInstance().connect("127.0.0.1");
   PLCManager::getInstance().setTurntableAngle(0);
5. 用Hsl工具测试下,这里再M100 位置 写入了一个byte ,值为1。
6,常用读写
void PLCManager::writeInt(int DBNumber, int StartByte, short value)
{
    if(!bConnected)
        return;
    uint8_t  bytes[2] = {0};
    std::memcpy(bytes, &value, sizeof(value));
    std::reverse(bytes, bytes + sizeof(bytes));
    client->WriteArea(Area,DBNumber,StartByte,2,S7WLByte,bytes);
}

short PLCManager::readInt(int DBNumber, int StartByte)
{
    if(!bConnected)
        return -1;

    uint8_t buffRead[2];
    int ret = client->ReadArea(Area,DBNumber,StartByte,2,S7WLByte,&buffRead);
    if(ret==0){
        short intValue = static_cast<int>((buffRead[1] & 0xFF) |
                                          ((buffRead[0] & 0xFF) << 8));

        return intValue;
    }else{
        return -1;
    }
}

void PLCManager::writeFloat(int DBNumber, int StartByte, float value)
{
    if(!bConnected)
        return;

    uint8_t  bytes[4] = {0};
    std::memcpy(bytes, &value, sizeof(value));
    std::reverse(bytes, bytes + sizeof(bytes));

    client->WriteArea(Area,DBNumber,StartByte,4,S7WLByte,bytes);
}

float PLCManager::readFloat(int DBNumber, int StartByte)
{
    if(!bConnected)
        return -1;

    uint8_t buffRead[4];

    int ret = client->ReadArea(Area,DBNumber,StartByte, 4,S7WLByte,buffRead);
    if(ret==0){
        uint32_t value = (static_cast<uint32_t>(buffRead[0]) << 24) |
                         (static_cast<uint32_t>(buffRead[1]) << 16) |
                         (static_cast<uint32_t>(buffRead[2]) << 8) |
                         static_cast<uint32_t>(buffRead[3]);

        float floatValue;
        std::memcpy(&floatValue, &value, sizeof(float));
        return floatValue;
    }else{
        return -1;
    }

}

void PLCManager::writeBool(int DBNumber, int StartByte, int StartBit, bool value)
{
    if(!bConnected)
        return;

    byte res[1]{0};
    int ret = client->ReadArea(Area,DBNumber,StartByte,1,S7WLByte,&res);
    if(ret==0){
        byte result[1]{0};
        if(!value){
            unsigned char mask = ~(1 << StartBit);
            result[0] = res[0] & mask;
        }else{
            unsigned char mask = 1 << StartBit;
            result[0] = res[0] | mask;
        }
        client->WriteArea(Area, DBNumber, StartByte, 1, S7WLByte, &result);
    }
}

bool PLCManager::readBool(int DBNumber, int StartByte, int StartBit)
{
    if(!bConnected)
        return -1;

    byte res[1]{0};
    //读一个字节 8位
    int ret = client->ReadArea(Area,DBNumber,StartByte,1,S7WLByte,&res);
    if(ret==0){
        //判断第StartBit位
        unsigned char mask = 1 << StartBit;
        unsigned char result = res[0] & mask;
        if(result!=0){
            return true;
        }else{
            return false;
        }
    }else{
        return false;
    }
}一,描述
Qt 通常使用信号和槽,进行模块间通信,但是绑定的时候,必须要有一个地方,同时知道信号和槽的所属对象,耦合性还是太紧密,这个库,只要按照规定的写法,就可以实现信号和槽的通信,并且不需要绑定,减少了一层耦合。
二,使用
A B两个类都需要包含头文件。#include PSEventController.h
A类中触发的地方,调用publish函数。
//比如按下按钮 ,需提供一个唯一的标识字符串,可自定义参数
PSEventController::publish(“addLine”,Q_ARG(bool,isChecked));
//此处的addLine 即为上述pulish 函数中的第一个参数,isChecked 为publis中的第二个参数
void on_psEvent_addLine(bool isChecked);
PSEventController::subscribe(this,addLine);
这样,A 和B 两个类 发布和订阅的唯一字符串标识符只要一致,A 在pubsh 的时候 B 就可以subscribe到,并且A 和B 完全耦合,相互不可见。
三,库 具体内容
//PSEventController.h
#ifndef PSEVENTCONTROLLER_H
#define PSEVENTCONTROLLER_H

#include <QObject>
#include <QReadWriteLock>
#include <QMap>
#include <QList>

#define METHOD_PREFIX on_psEvent_

class PSEventController : public QObject
{
    Q_OBJECT
public:
    static void unSubscribe(QObject* listener, const QByteArray& eventName);
    static bool subscribe(QObject* listener, const QByteArray& eventName);
    static bool publish(const QByteArray& eventName, Qt::ConnectionType connectionType,
        QGenericArgument val0 = QGenericArgument(), QGenericArgument val1 = QGenericArgument(),
        QGenericArgument val2 = QGenericArgument(), QGenericArgument val3 = QGenericArgument(),
        QGenericArgument val4 = QGenericArgument(), QGenericArgument val5 = QGenericArgument(),
        QGenericArgument val6 = QGenericArgument(), QGenericArgument val7 = QGenericArgument(),
        QGenericArgument val8 = QGenericArgument(), QGenericArgument val9 = QGenericArgument());

    static inline bool publish(const QByteArray& eventName,
        QGenericArgument val0 = QGenericArgument(), QGenericArgument val1 = QGenericArgument(),
        QGenericArgument val2 = QGenericArgument(), QGenericArgument val3 = QGenericArgument(),
        QGenericArgument val4 = QGenericArgument(), QGenericArgument val5 = QGenericArgument(),
        QGenericArgument val6 = QGenericArgument(), QGenericArgument val7 = QGenericArgument(),
        QGenericArgument val8 = QGenericArgument(), QGenericArgument val9 = QGenericArgument())
    {
        return publish(eventName, Qt::AutoConnection, val0, val1, val2, val3, val4, val5, val6, val7, val8, val9);
    }

    static inline QString get_Errors()
    {
        return ps_LastError_;
    }

    static inline void clearEvents()
    {
        QWriteLocker locker(&ps_Lock_);
        psEvents_pool_.clear();
    }

    static inline QByteArray methodFormatting(const QByteArray& eventName) {
        return METHOD_PREFIX + eventName;
    }
private:
    static QMap<QByteArray, QList<QObject*>> psEvents_pool_;
    static QReadWriteLock ps_Lock_;

    static QString ps_LastError_;
};

#endif // PSEVENTCONTROLLER_H
//PSEventController.cpp
#include PSEventController.h
#include <QWriteLocker>
QMap<QByteArray, QList<QObject*>> PSEventController::psEvents_pool_;
QReadWriteLock PSEventController::ps_Lock_;
QString PSEventController::ps_LastError_;
void PSEventController::unSubscribe(QObject* listener, const QByteArray& eventName)
{
QWriteLocker locker(&ps_Lock_);
int index = -1;
if (psEvents_pool_.contains(eventName) &&
(index = psEvents_pool_[eventName].indexOf(listener)) >= 0 && index < psEvents_pool_[eventName].count())
psEvents_pool_[eventName].takeAt(index);
}
bool PSEventController::subscribe(QObject* listener, const QByteArray& eventName)
{
QWriteLocker locker(&ps_Lock_);
if (psEvents_pool_.contains(eventName)) {
if (-1 != psEvents_pool_[eventName].indexOf(listener)) {
ps_LastError_ = QString(This object is subscribed to this eventName);
return false;
}
psEvents_pool_[eventName].push_back(listener);
return true;
} else {
psEvents_pool_.insert(eventName, { listener });
return true;
}
}
bool PSEventController::publish(const QByteArray& eventName, Qt::ConnectionType connectionType,
QGenericArgument val0, QGenericArgument val1, QGenericArgument val2, QGenericArgument val3,
QGenericArgument val4, QGenericArgument val5, QGenericArgument val6, QGenericArgument val7,
QGenericArgument val8, QGenericArgument val9)
{
QReadLocker locker(&ps_Lock_);
if (!psEvents_pool_.contains(eventName)) {
ps_LastError_ = QString(No objects subscribe to this eventName);
return false;
}
auto methodName = methodFormatting(eventName);
QStringList errors;
for (auto listener : psEvents_pool_[eventName]) {
if (!listener)
continue;
auto ret = QMetaObject::invokeMethod(listener, methodName, connectionType,
val0, val1, val2, val3, val4, val5, val6, val7, val8, val9);
if (!ret)
errors.append(QString(%1:%2).arg(listener->metaObject()->className()).arg(listener->objectName()));
}
if (errors.isEmpty())
return true;
ps_LastError_ = QString(%1 execution failed:[\n).arg(QString(eventName));
for (auto& err : errors)
ps_LastError_ += QString(%1;\n).arg(err);
ps_LastError_ += ]\n;
return false;
}一, 需求
Qt使用mqtt协议与服务端进行通信。
二,使用
#ifndef MQTTMANAGERT_H
#define MQTTMANAGERT_H

#include <iostream>
#include <mqtt/qmqtt.h>

class MQTTManager:public QObject
{
    Q_OBJECT
public:
    static MQTTManager* instance();

    void setInTemperature(QString newInTemperature);

private:
    ~MQTTManager();
    MQTTManager();

public slots:
    void doConnected();
    void onSubscribed(const QString& topic);
    void doDisconnected();
    void doDataReceived(QMQTT::Message message);

signals:
    void inTemperatureChanged();

private:
    //mqtt客户端
    QMQTT::Client *client;
    static MQTTManager *manager;

    //室内温度
    QString inTemperature;

};
#endif // MQTTMANAGERT_H
#include "mqttManagert.h"
MQTTManager* MQTTManager::manager=nullptr;
const QString HOST= "127.0.0.1";

//温度和湿度
const QString TOPIC_IN_TEMPERATURE_HUMIDITY ="qmqtt/in_temperature_humidity";

MQTTManager::MQTTManager(){
    client = new QMQTT::Client(QHostAddress(HOST),1883,this);
    connect(client,&QMQTT::Client::connected,this,&MQTTManager::doConnected);
    connect(client,&QMQTT::Client::disconnected,this,&MQTTManager::doDisconnected);
    connect(client,&QMQTT::Client::received,this,&MQTTManager::doDataReceived);
    connect(client, &QMQTT::Client::subscribed, this, &MQTTManager::onSubscribed);

    client->connectToHost();
}

MQTTManager::~MQTTManager(){
    client->disconnected();
}

MQTTManager* MQTTManager::instance(){
    if(!manager){
        manager = new MQTTManager();
    }
    return manager;
}

void MQTTManager::doConnected(){
    qDebug()<<"doConnected ok";
    client->subscribe(TOPIC_IN_TEMPERATURE_HUMIDITY);
}
void MQTTManager::onSubscribed(const QString& topic)
{
    qDebug() << "onSubscribed " << topic;
}

//解析数据
void MQTTManager::doDataReceived(QMQTT::Message message){
    QString mes = QString(message.id())+" "+QString(message.qos())+" "+message.topic()+" "+message.payload()+"\n";
    if(message.topic()==TOPIC_IN_TEMPERATURE_HUMIDITY){
        QStringList dataList = QString(message.payload()).split(",");
        if(dataList.size()==2){
            setInTemperature(dataList[0]);
        }
    }
}

void MQTTManager::doDisconnected(){
    qDebug()<<"doDisconnected ok";
}

void MQTTManager::setInTemperature(QString newInTemperature)
{
    if (inTemperature == newInTemperature)
        return;
    inTemperature = newInTemperature;
    emit inTemperatureChanged();
}
publish(const QMQTT::Message& message)一,需求
Qt调用http接口,如果使用本身的network库需要做大量的工作,采用httplib这个库,则调用起来就特别优雅。
二,使用
这个库就是一个头文件,直接include进去即可。
https://github.com/yhirose/cpp-httplib
看一个客户端列子。
#include <httplib.h>
#include <iostream>
int main(void)
{
//定义客户端
httplib::Client cli("localhost", 1234);

//调用get接口
if (auto res = cli.Get("/hi")) {
if (res->status == StatusCode::OK_200) {
  std::cout << res->body << std::endl;
}
} else {
auto err = res.error();
std::cout << "HTTP error: " << httplib::to_string(err) << std::endl;
}
}
服务端写起来也很方便。
#include <httplib.h>
int main(void)
{
using namespace httplib;

Server svr;

svr.Get("/hi", [](const Request& req, Response& res) {
res.set_content("Hello World!", "text/plain");
});

// Match the request path against a regular expression
// and extract its captures
svr.Get(R"(/numbers/(\d+))", [&](const Request& req, Response& res) {
auto numbers = req.matches[1];
res.set_content(numbers, "text/plain");
});

// Capture the second segment of the request path as "id" path param
svr.Get("/users/:id", [&](const Request& req, Response& res) {
auto user_id = req.path_params.at("id");
res.set_content(user_id, "text/plain");
});

// Extract values from HTTP headers and URL query params
svr.Get("/body-header-param", [](const Request& req, Response& res) {
if (req.has_header("Content-Length")) {
  auto val = req.get_header_value("Content-Length");
}
if (req.has_param("key")) {
  auto val = req.get_param_value("key");
}
res.set_content(req.body, "text/plain");
});

svr.Get("/stop", [&](const Request& req, Response& res) {
svr.stop();
});

svr.listen("localhost", 1234);
}
//客户端传图例子
QString file = QCoreApplication::applicationDirPath() + "/hf.jpg";
httplib::Client cli(ip, port);
cli.set_connection_timeout(0, 300000); // 300 milliseconds
cli.set_read_timeout(5, 0); // 5 seconds
cli.set_write_timeout(5, 0); // 5 seconds
std::ifstream sfile(file.toStdString().c_str(), std::ios::binary);
std::string imageData((std::istreambuf_iterator<char>(sfile)), std::istreambuf_iterator<char>());
httplib::MultipartFormDataItems items = {
{"file", imageData, "hf.jpg", "application/octet-stream"},
};
auto res = cli.Post("/infer", items);
if (res&&res->status == 200)
{
std::string body = res->body;
std::cout << "上传成功: " << body;
}